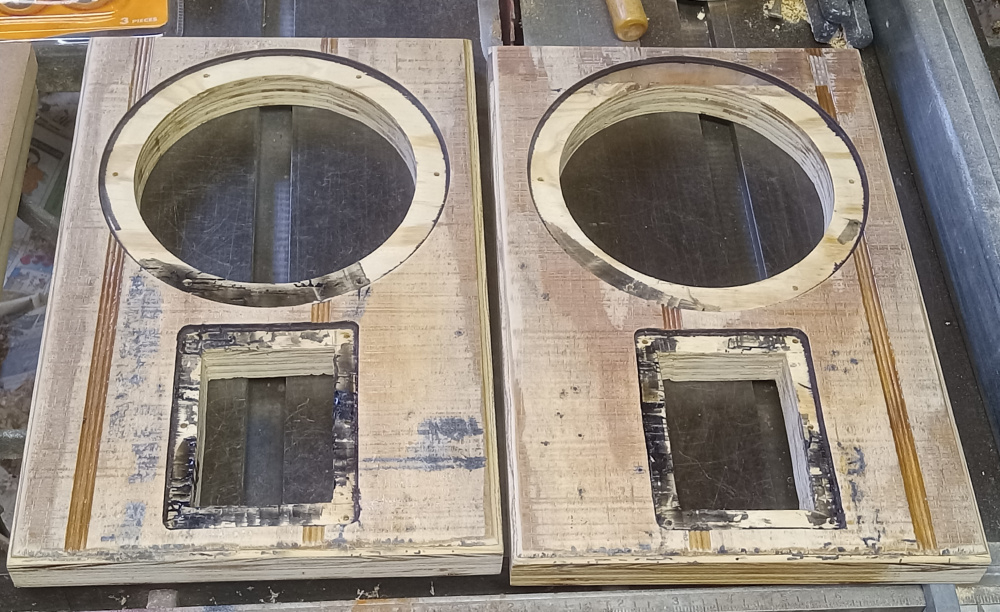
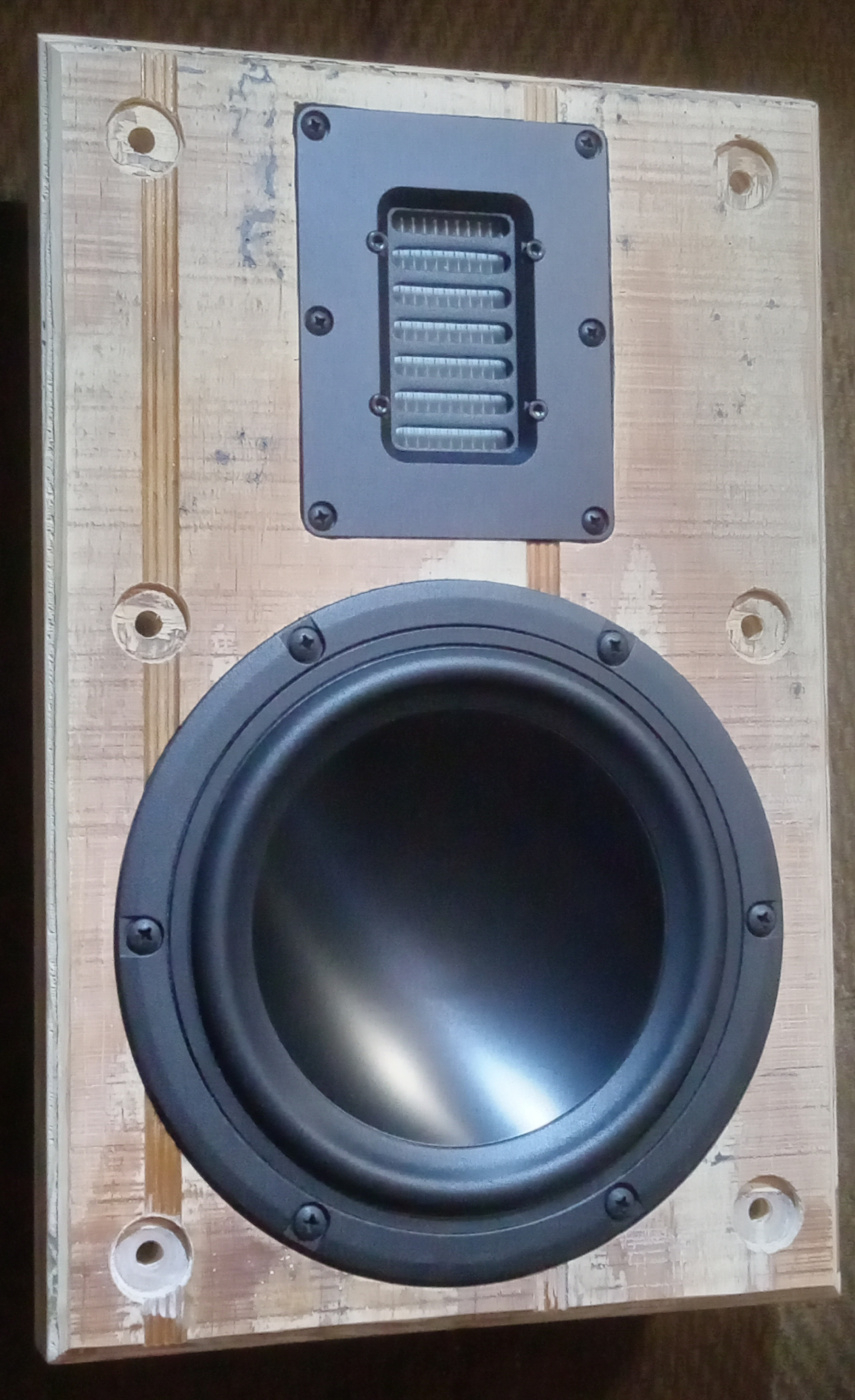
Found some wood in the garage that I forgot or didnt know about. Not sure where it came from as I've never used this stuff. I was looking for scrap pieces to build baffle thickness for another pending Versabox baffle and found this stuff. Thought it was neat enough to be a front and center aesthetic point for this design. I had more than enough for the job but not much more. I sanded it down first to clean it up and applied polyurethane to seal it. Then I used the trusty West Systems epoxy and a scrap plastic faux credit card to spread it across the surface evenly. I have yet to fill in the pores completely, but have some Dap Walnut Plastic-wood for contrast in that process. I then glued it to a piece of 3/4" thick plywood for thickness, cut to width and length, and sanded the edges. I will likely just apply polyurethane to the edges and backs. I don't know that the AMTHR4 will allow for a double sided routing like in the Jaekels and Itasca, but time will tell. I saved as much of the spalting effect as possible, and effectively cut it in the best spot to provide effects at the top of both baffles, and have mirrored slots from the T111. I like how it looks. I like how it feels to the touch.
I have a channel void to fill at the bottom of one that goes from side to side before I route rebates. I also plan on a small chamfer along the front vertical edges.
That thought has definitely crossed my mind. I've wanted to do that ever since Ed LaFontaine built the 2 pair of "hay bails" out of OSB.
Step 1- apply a coat of epoxy
Step 2 - apply a second coat of epoxy
Step 3 - sand and repeat ad infinitum
My old infinite baffle rig for measuring buyout drivers was 100% OSB. Worked fine for that purpose. Other than covering OSB with paper backed veneer, not sure how else I would finish it and be happy with the look.
I did glue a 3/4" thick plywood to the back for thickness, so it is closer to 1" thick now.
I'm hoping the shallower grooves are less detrimental to the FR.
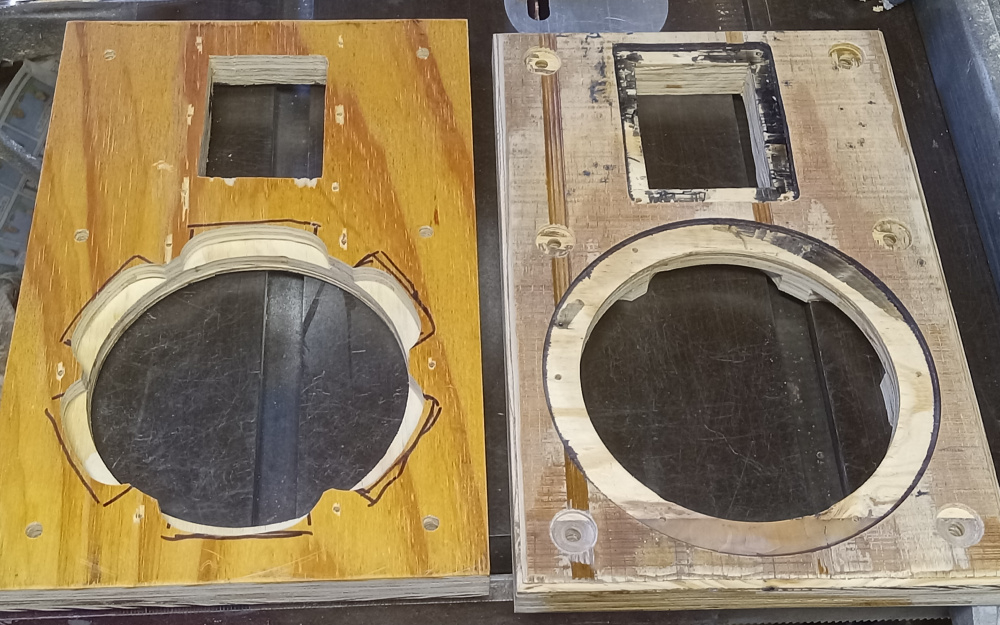
Braved the cold with long underwear and a heavy coat to get the last bit of woodworking done. Basically just worm-channel-filling and finishing left before I can do whoops on these....
Heads up for those considering these AMTHR4 tweeters, the recess was cut with a half inch pattern bit. However, the corners on the tweeters are about a 3/16" radius. The 3/8" straight bit was used to cut those by hand afterwards.
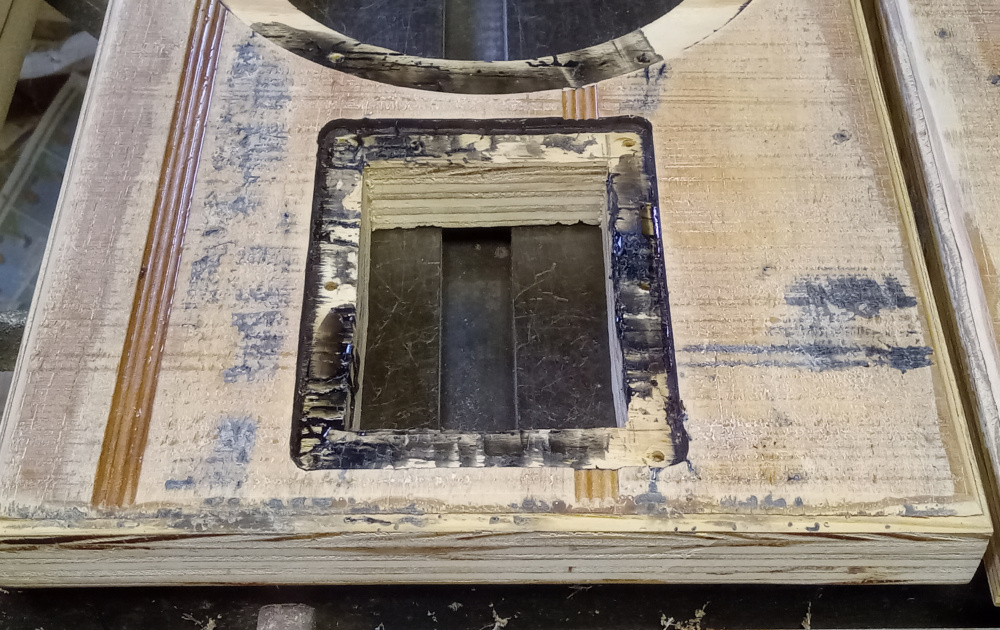
Layered up and finished all but and up to needing to apply the finish coat(s), but the rest is done. Used black hot glue to fill the spalted bits aka worm eaten channels. The effect worked in some ways and not in others, but should suffice this time around. I was watching Four Eyes Furniture on YouTube that gave me the idea. He uses 123 aluminum blocks to flatten the glue while it cools, then scrapes off the excess with a chisel, and/or ultimately resurfaces his workpieces via the CNC. I wanted the contrast to the pine ply color via the black material, and used a combination of a spare heatsink and chisel, or just the chisel depending on where the pending flaws were located. After a good power resand with 320, a scrape with a wire brush, and a quick vacuum of the surface, it looks mostly okay. If the wood was less grooved like the T111 happens to be, I feel the effect would have been better targeted.
Having a drill press was mandatory for boring the baffle mounts for the bolts due to the channels in the surface. Took some fenagling, but got it licked. Used a rabbet bit for the rear-side scallops.
I had a massive 3 hour measurement fest this afternoon. Measured for the 3 pending Versabox designs; this one, Itasca, and Jaekels, as well as getting the final information measured for the Pangolins after that last reported tweak.
So- data dump number one....
I took FR and HD for the drivers mounted in the Versabox, and used a 40uF cap on the AMTHR-4 this time vs the 25uF of the previous. It should have left enough to show the required rolloff information.
Xover is about 2.4kHz as it fell into place. I notched the upper octave peak in the AMT. The dip centered at 2kHz is an attempt to reduce the SIG amplitude of the possible breakup just above xover rolloff at 3khz. This frequency range is now at -15dB from reference. While I know this is not -25dB or more from reference, it may not be as audible due to how the woofer was designed. If it IS audible in listening, then it will likely require a 3rd order lowpass with a breakup notch on the woofer just to get alignment with the tweeter. As it sits at the moment, the woofer lowpass is a bit overdamped on purpose.
I had tried that tweeter about that low but with a second order and did not like how it sounded, I landed at 3k 2nd order, and like what I am hearing with the tweeter. I'm excited to hear your listening impressions.
I find most planar/ribbon/AMT do not like 12dB electrical networks, unless at a considerably higher frequency or having to attenuate a lot of output. 3rd order elec or higher tend to be the norm. Being it has a larger membrane than some others, I feel like I should be able to get away with what I have pictured above. The HD2 rises to -35dB starting about 2.2kHz, and is roughly -40dB or less above there.
In the Nephila, I had to shave off about 15dB, and the shaping was allowed along with a 12dB electrical network, but at 3.4kHz.
The Vijon required 4th order electrical for the RT1.3 at 3kHz, less padding.
Stance were 2nd elec at 3.2K, minus 12dB or so.
Attitudes were 3rd elec at 4.5k, and -12dB attenuated.
Franciums were 12dB at 4k, with notch at resonance, removed about 10dB, IIRC.
The old Ravens advertised 8th order electrical networks.
I just finished trying to simulate a 3rd order with the woofer and notching the 3kHz breakup. I was able to get the breakup down further, varying in level depth depending on what I was happy with. Meaning, the lower the breakup, the more an introduction of a larger dip in the woofer passband. This would involve pushing the AMT lower to flatten it out again, which is not really in the cards. While making the woofer electrical circuit 4th order in theory could make it work, unless I could remove other parts and still get there, I think I would have to find a different driver complement.
Hopefully, this parts arrangement as above will blend well. Going down the Crossover Road...
Haven't posted this image for awhile, but I thought I'd repost it. My wife took it from the passenger seat while passing through Dayton, OH heading south to drop off the 3CR-Ti for the article in the flyer back in 2007. Several years later, there was some reconstruction in that area and the road actually was removed and/or renamed and no longer exists. I like the premise that a xover is like a journey, or a road to travel.
Used 1.5" PVC for the bobbin, sliced to 1.25" long.
1.23mH/18awg, 2.5" D x 1.6" H after winding, 0.6 ohms. Blue (dri-oil) enamel, which is apparently harder to find than you think. Where the green usually is darker in color, the blue resembles more of a teal color.
I read in a search that magnet wire comes in other polyurethane enamel colors than brown, green, red, and natural/clear; like purple, blue, etc. Said also in what I read that they could be special ordered. I found 2 blue spools, and pretty much nothing else but the standard 4 colors, and bought the larger of the 2 blue spools.
I'm going to wind the other 4 coils in the xover the same way with the same stuff.
I've been using the Thomas and Betts steel barbed ties for my coils for a long time now. They have never let me down. The GB steel barbed heads snapped off when I tightened them down.
Coil wrapping is really all I use those types for, as I want a reliable grip that won't let go.
Comments
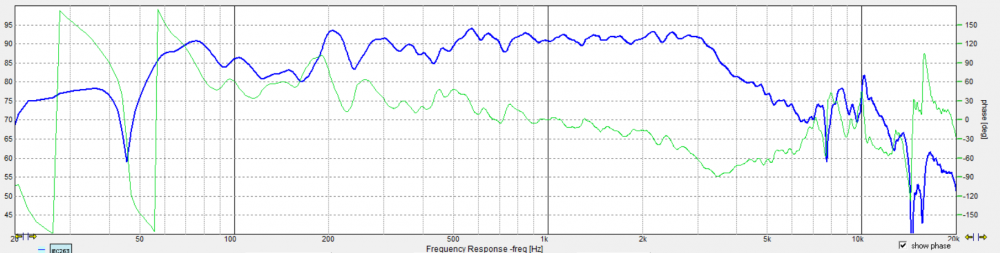
What I show above is it so far. Judging from the graphs, it rolls off naturally about 2k, but HD is good to roughly 1.5k.
InDIYana Event Website
Found some wood in the garage that I forgot or didnt know about. Not sure where it came from as I've never used this stuff. I was looking for scrap pieces to build baffle thickness for another pending Versabox baffle and found this stuff. Thought it was neat enough to be a front and center aesthetic point for this design. I had more than enough for the job but not much more. I sanded it down first to clean it up and applied polyurethane to seal it. Then I used the trusty West Systems epoxy and a scrap plastic faux credit card to spread it across the surface evenly. I have yet to fill in the pores completely, but have some Dap Walnut Plastic-wood for contrast in that process. I then glued it to a piece of 3/4" thick plywood for thickness, cut to width and length, and sanded the edges. I will likely just apply polyurethane to the edges and backs. I don't know that the AMTHR4 will allow for a double sided routing like in the Jaekels and Itasca, but time will tell. I saved as much of the spalting effect as possible, and effectively cut it in the best spot to provide effects at the top of both baffles, and have mirrored slots from the T111. I like how it looks. I like how it feels to the touch.
I have a channel void to fill at the bottom of one that goes from side to side before I route rebates. I also plan on a small chamfer along the front vertical edges.
InDIYana Event Website
At some point I want to do a build with OSB.
https://ibuildit.ca/projects/making-a-powered-sub-woofer/
That thought has definitely crossed my mind. I've wanted to do that ever since Ed LaFontaine built the 2 pair of "hay bails" out of OSB.
Step 1- apply a coat of epoxy
Step 2 - apply a second coat of epoxy
Step 3 - sand and repeat ad infinitum
They look really cool if done right.
InDIYana Event Website
My old infinite baffle rig for measuring buyout drivers was 100% OSB. Worked fine for that purpose. Other than covering OSB with paper backed veneer, not sure how else I would finish it and be happy with the look.
Those boards look exactly like the plywood siding panels I used to sheath my shed. They took exterior latex paint very well.
https://www.homedepot.com/p/Plytanium-Plywood-Siding-Panel-T1-11-8-IN-OC-Nominal-19-32-in-x-4-ft-x-8-ft-Actual-0-563-in-x-48-in-x-96-in-113699/100000016
The link says 19/32, so that is the thicker stuff with deeper grooves. The stuff I used here is only 3/8" thick.
InDIYana Event Website
Ok so even crappier material than my shed siding... you go with that!
I did glue a 3/4" thick plywood to the back for thickness, so it is closer to 1" thick now.
I'm hoping the shallower grooves are less detrimental to the FR.
InDIYana Event Website
Braved the cold with long underwear and a heavy coat to get the last bit of woodworking done. Basically just worm-channel-filling and finishing left before I can do whoops on these....
InDIYana Event Website
Thanks for sparing us a picture- holiday related or not. ha
Heads up for those considering these AMTHR4 tweeters, the recess was cut with a half inch pattern bit. However, the corners on the tweeters are about a 3/16" radius. The 3/8" straight bit was used to cut those by hand afterwards.
InDIYana Event Website
Layered up and finished all but and up to needing to apply the finish coat(s), but the rest is done. Used black hot glue to fill the spalted bits aka worm eaten channels. The effect worked in some ways and not in others, but should suffice this time around. I was watching Four Eyes Furniture on YouTube that gave me the idea. He uses 123 aluminum blocks to flatten the glue while it cools, then scrapes off the excess with a chisel, and/or ultimately resurfaces his workpieces via the CNC. I wanted the contrast to the pine ply color via the black material, and used a combination of a spare heatsink and chisel, or just the chisel depending on where the pending flaws were located. After a good power resand with 320, a scrape with a wire brush, and a quick vacuum of the surface, it looks mostly okay. If the wood was less grooved like the T111 happens to be, I feel the effect would have been better targeted.
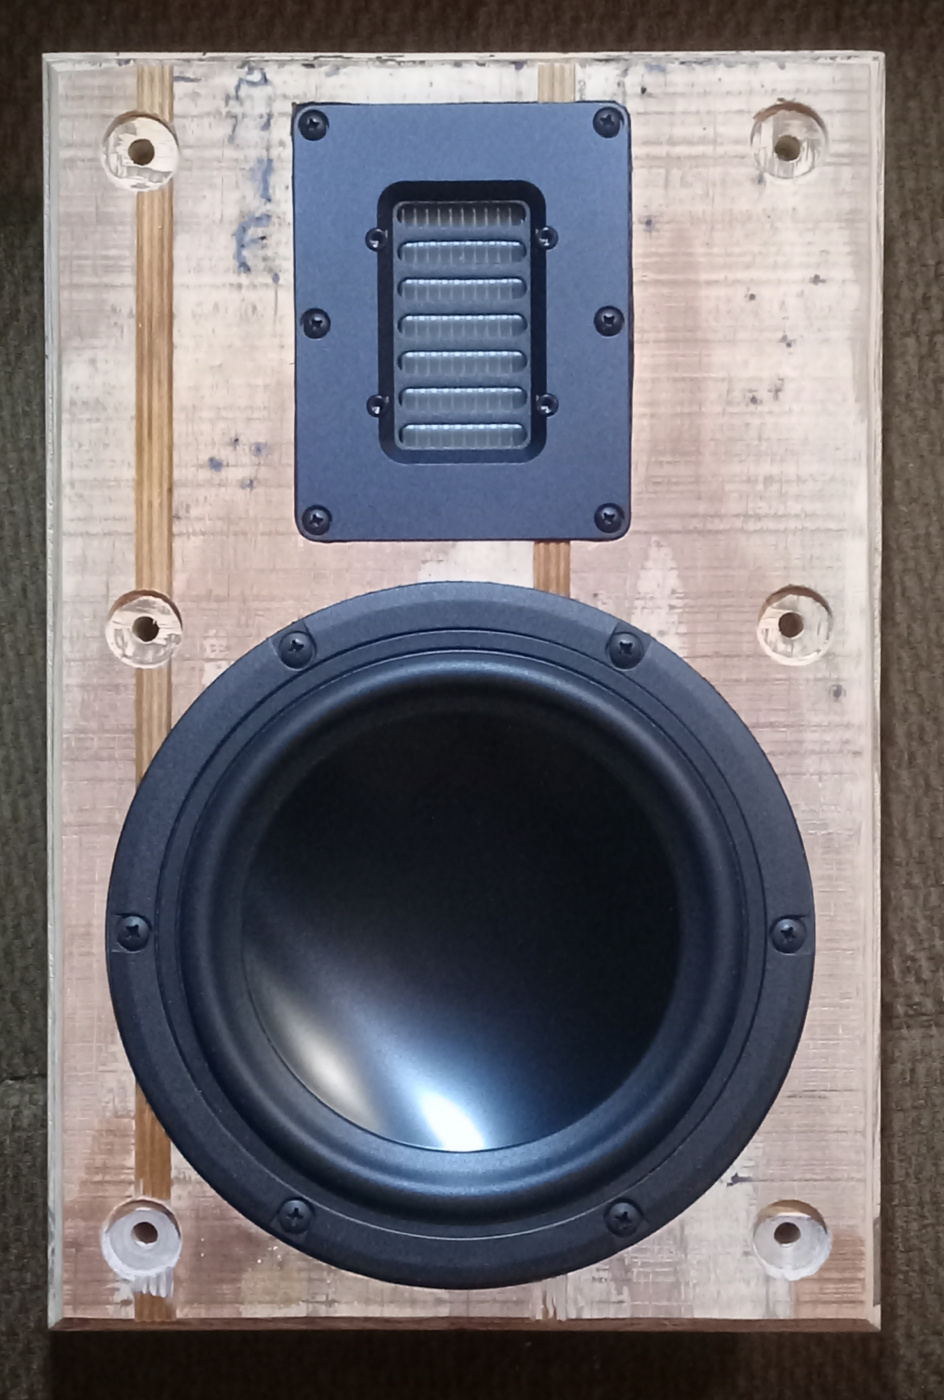
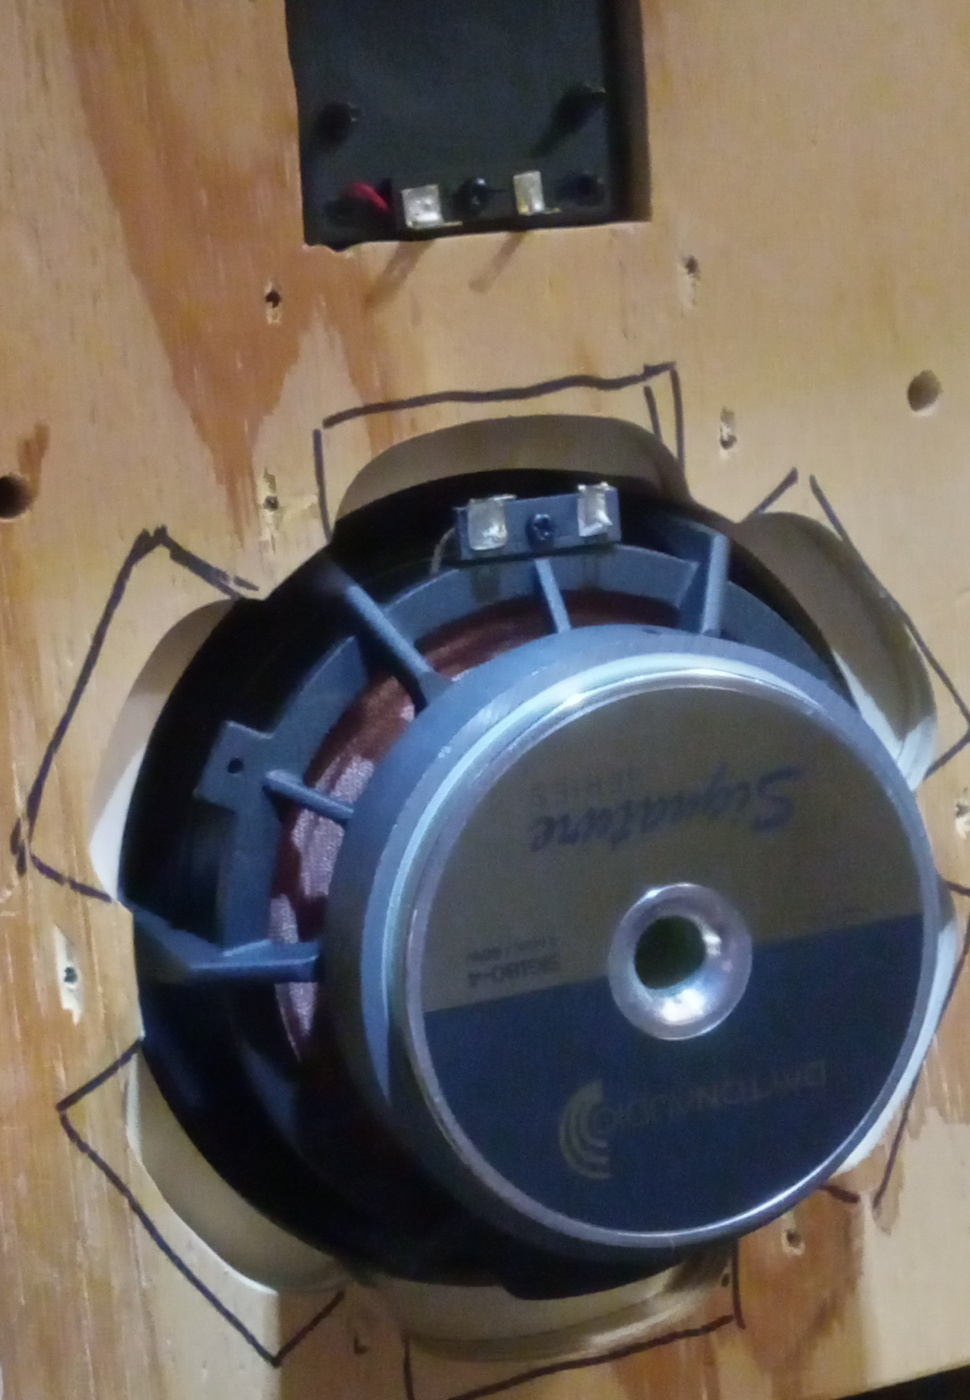
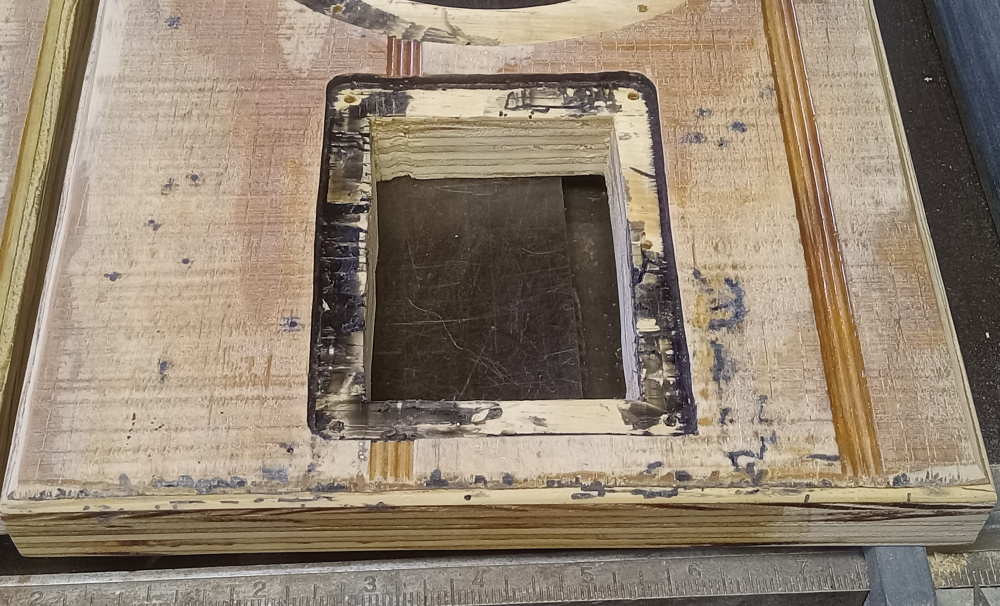
Having a drill press was mandatory for boring the baffle mounts for the bolts due to the channels in the surface. Took some fenagling, but got it licked. Used a rabbet bit for the rear-side scallops.
More to come when sweeps are taken...
InDIYana Event Website
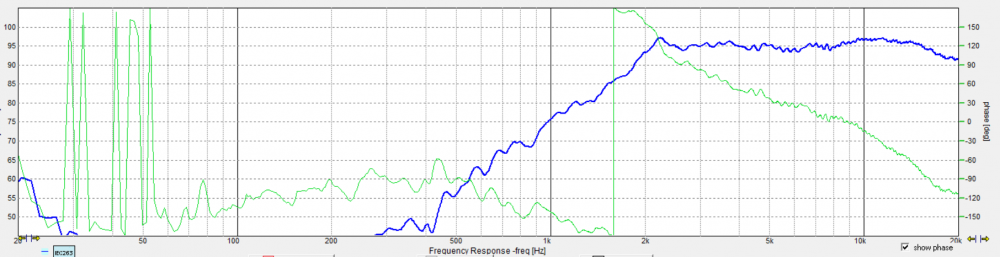
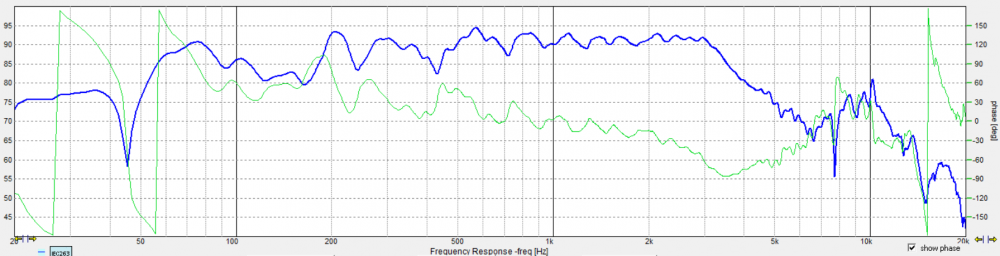
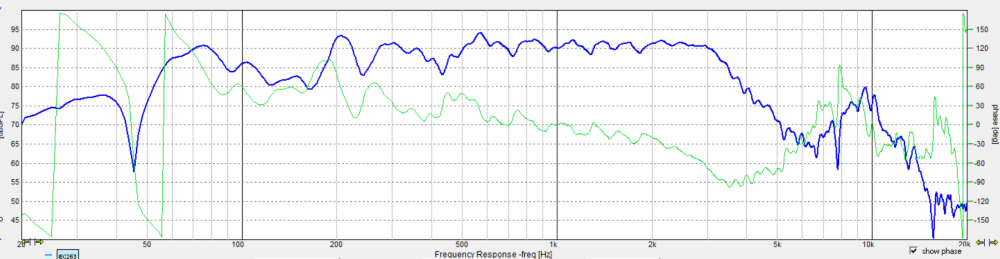
I had a massive 3 hour measurement fest this afternoon. Measured for the 3 pending Versabox designs; this one, Itasca, and Jaekels, as well as getting the final information measured for the Pangolins after that last reported tweak.
So- data dump number one....
I took FR and HD for the drivers mounted in the Versabox, and used a 40uF cap on the AMTHR-4 this time vs the 25uF of the previous. It should have left enough to show the required rolloff information.
AMTHR-4:
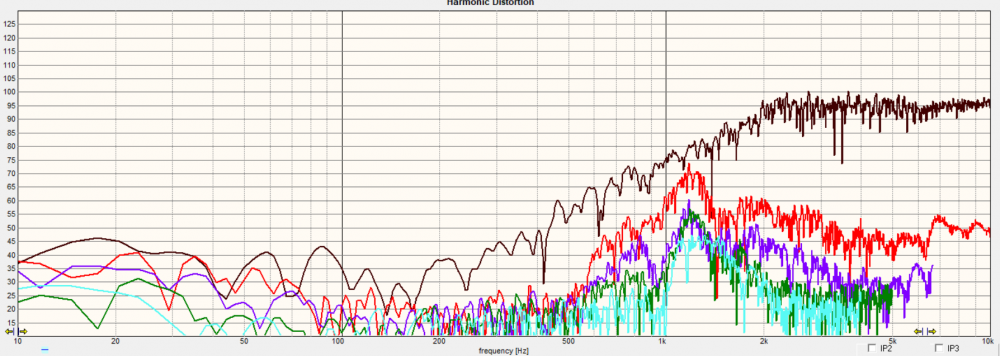
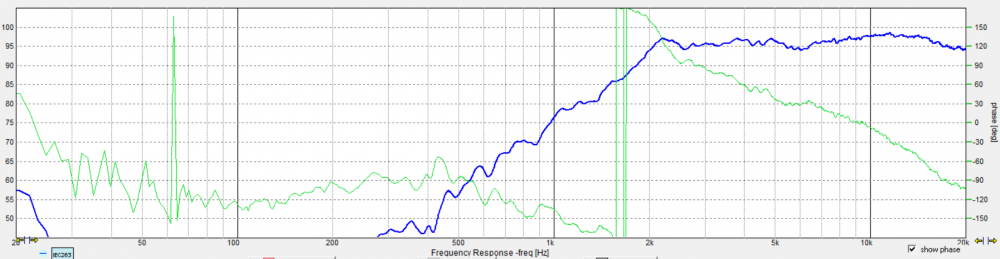
HD:
FR of 0/15/30/45 horizontal axes:
SIG180-4:
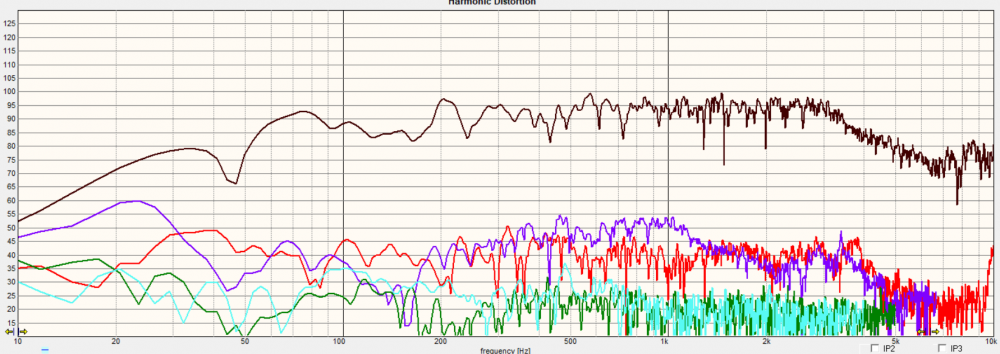
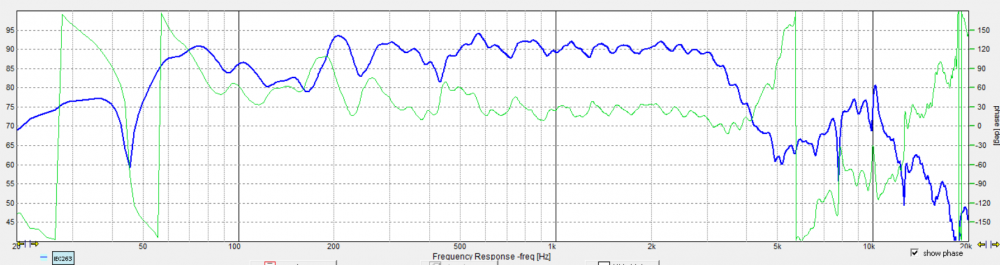
HD:
0/15/30/45:
InDIYana Event Website
InDIYana Event Website
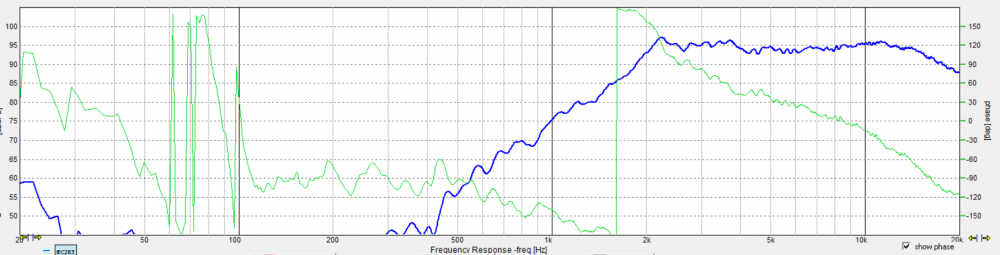
Sim1...
InDIYana Event Website
Xover is about 2.4kHz as it fell into place. I notched the upper octave peak in the AMT. The dip centered at 2kHz is an attempt to reduce the SIG amplitude of the possible breakup just above xover rolloff at 3khz. This frequency range is now at -15dB from reference. While I know this is not -25dB or more from reference, it may not be as audible due to how the woofer was designed. If it IS audible in listening, then it will likely require a 3rd order lowpass with a breakup notch on the woofer just to get alignment with the tweeter. As it sits at the moment, the woofer lowpass is a bit overdamped on purpose.
InDIYana Event Website
I had tried that tweeter about that low but with a second order and did not like how it sounded, I landed at 3k 2nd order, and like what I am hearing with the tweeter. I'm excited to hear your listening impressions.
I find most planar/ribbon/AMT do not like 12dB electrical networks, unless at a considerably higher frequency or having to attenuate a lot of output. 3rd order elec or higher tend to be the norm. Being it has a larger membrane than some others, I feel like I should be able to get away with what I have pictured above. The HD2 rises to -35dB starting about 2.2kHz, and is roughly -40dB or less above there.
In the Nephila, I had to shave off about 15dB, and the shaping was allowed along with a 12dB electrical network, but at 3.4kHz.
The Vijon required 4th order electrical for the RT1.3 at 3kHz, less padding.
Stance were 2nd elec at 3.2K, minus 12dB or so.
Attitudes were 3rd elec at 4.5k, and -12dB attenuated.
Franciums were 12dB at 4k, with notch at resonance, removed about 10dB, IIRC.
The old Ravens advertised 8th order electrical networks.
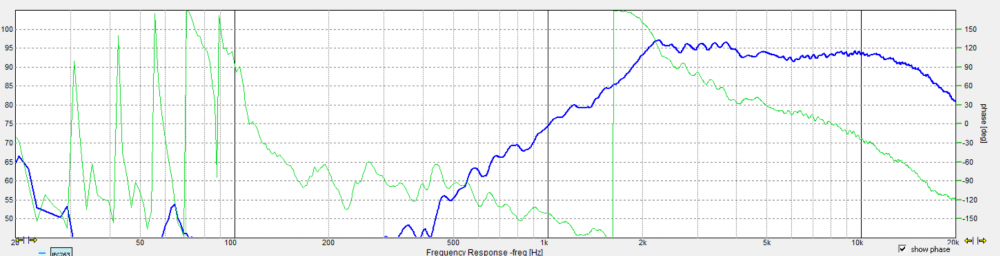
I just finished trying to simulate a 3rd order with the woofer and notching the 3kHz breakup. I was able to get the breakup down further, varying in level depth depending on what I was happy with. Meaning, the lower the breakup, the more an introduction of a larger dip in the woofer passband. This would involve pushing the AMT lower to flatten it out again, which is not really in the cards. While making the woofer electrical circuit 4th order in theory could make it work, unless I could remove other parts and still get there, I think I would have to find a different driver complement.
Hopefully, this parts arrangement as above will blend well. Going down the Crossover Road...
InDIYana Event Website
Haven't posted this image for awhile, but I thought I'd repost it. My wife took it from the passenger seat while passing through Dayton, OH heading south to drop off the 3CR-Ti for the article in the flyer back in 2007. Several years later, there was some reconstruction in that area and the road actually was removed and/or renamed and no longer exists. I like the premise that a xover is like a journey, or a road to travel.
InDIYana Event Website
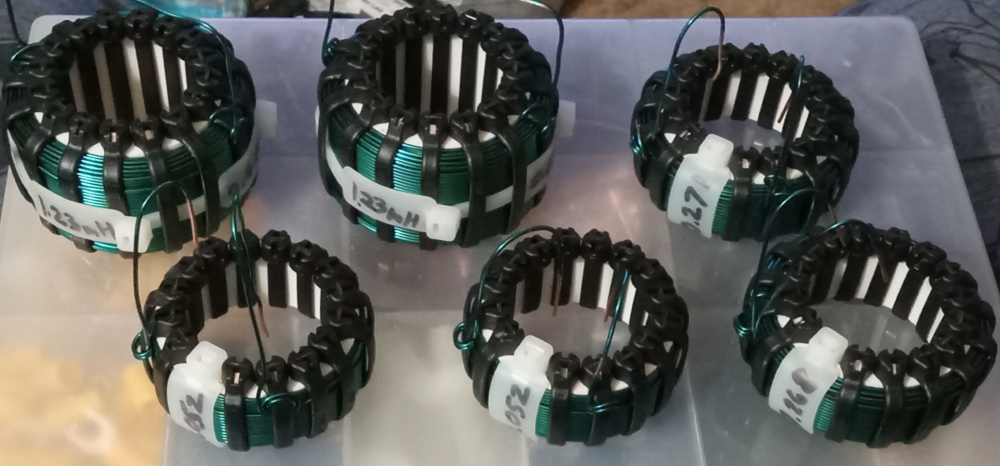
Wound a pair of these...

Used 1.5" PVC for the bobbin, sliced to 1.25" long.
1.23mH/18awg, 2.5" D x 1.6" H after winding, 0.6 ohms. Blue (dri-oil) enamel, which is apparently harder to find than you think. Where the green usually is darker in color, the blue resembles more of a teal color.
I read in a search that magnet wire comes in other polyurethane enamel colors than brown, green, red, and natural/clear; like purple, blue, etc. Said also in what I read that they could be special ordered. I found 2 blue spools, and pretty much nothing else but the standard 4 colors, and bought the larger of the 2 blue spools.
I'm going to wind the other 4 coils in the xover the same way with the same stuff.
InDIYana Event Website
...and using fancy zip ties, nice!
. . . and a passel of them . . .
I've been using the Thomas and Betts steel barbed ties for my coils for a long time now. They have never let me down. The GB steel barbed heads snapped off when I tightened them down.
Coil wrapping is really all I use those types for, as I want a reliable grip that won't let go.
InDIYana Event Website
A zip-tie gun is also recommended. Mine is a Paladin Tools version.
InDIYana Event Website
The blue inductor, or really anything other than red, is pretty cool!!
I bet those T&B steel barbed ties really mess up your coils inductance and distortion. J/K of course.
Kidding or not, there isn't enough of it to matter.
InDIYana Event Website
And here is the whole coil family for this build....
Layout is next....
InDIYana Event Website
Nice overkill assembly effort - speaks of quality and pride in workmanship.