I wouldn't buy one again. Yes they work, but you only need it if you didn't store your filament correctly. If you do get a roll of filament "wet" put it back in the bag with the dryer bags for a week or two. You can also use your bed heater to dry your filament.
I save all the dryer bags that come with filament and add a few when I put filament back in the bag. Those little dryer bags can also be baked to get them dryer.
Point being save your money.
It works well and I have had new filament that is very wet right out of the box (50% RH) . Humidity isn't much of a problem in Iowa in the winter because the furnace and the weather dry the house out. Summer is a different story.
The only problem I've had with the dryer is when I used it to dry some TPU and forgot to set the temp back down for PLA. It got hot enough to make the PLA stick to itself on the spool which caused the extruder gear to strip the filament and quit printing.
I have a friend who uses a counter top toaster oven. They can be picked up cheap at places like Goodwill.
I saw the device on the left with the threaded brass insert, and assumed that you had duplicated the threaded insert in the 3 d print. I now see that is not the case, the print appears to have a straight hole.
But Chahly - Stahkist don't want speakers that look good, Stahkist wants speakers that sound good!
@rjj45 said:
I saw the device on the left with the threaded brass insert, ...
Look up "Ruthex" heat set inserts on Amazon. I have bought some, as well as solder tips and accessories but haven't actually used any. I also saw a YouTube video where they were testing several different brands of heat set inserts and they also included just screwing directly into PLA. The direct screw into PLA actually held a LOT of weight, so for little waveguides and such, I don't even need the fancy inserts.
@rjj45 said:
I saw the device on the left with the threaded brass insert, and assumed that you had duplicated the threaded insert in the 3 d print. I now see that is not the case, the print appears to have a straight hole.
Gotcha! I've never tried threads in a 3D print. I designed pockets for the 1/4-20 nuts on the back side of this piece. We have a few people on staff who regularly over-tighten and break things, so I wanted to make it as durable as possible.
I recently printed a spool winder for filament spools that had threads. I got the files from the internet so I don't know if they did anything special but the threads and nut work fine.
I had my first & second print failure. The first on Sunday was just a raft that didn't stick well, so I stopped the print and started it again. It printed just fine. The second fail was overnight. It got about 75% complete and then nothing. The screen said complete, but obviously it wasn't putting down any material. Not sure yet if it's jammed extruder gears or if the hot end is clogged up.
-- It was a clog. Heated it up 240 and that cleared it.
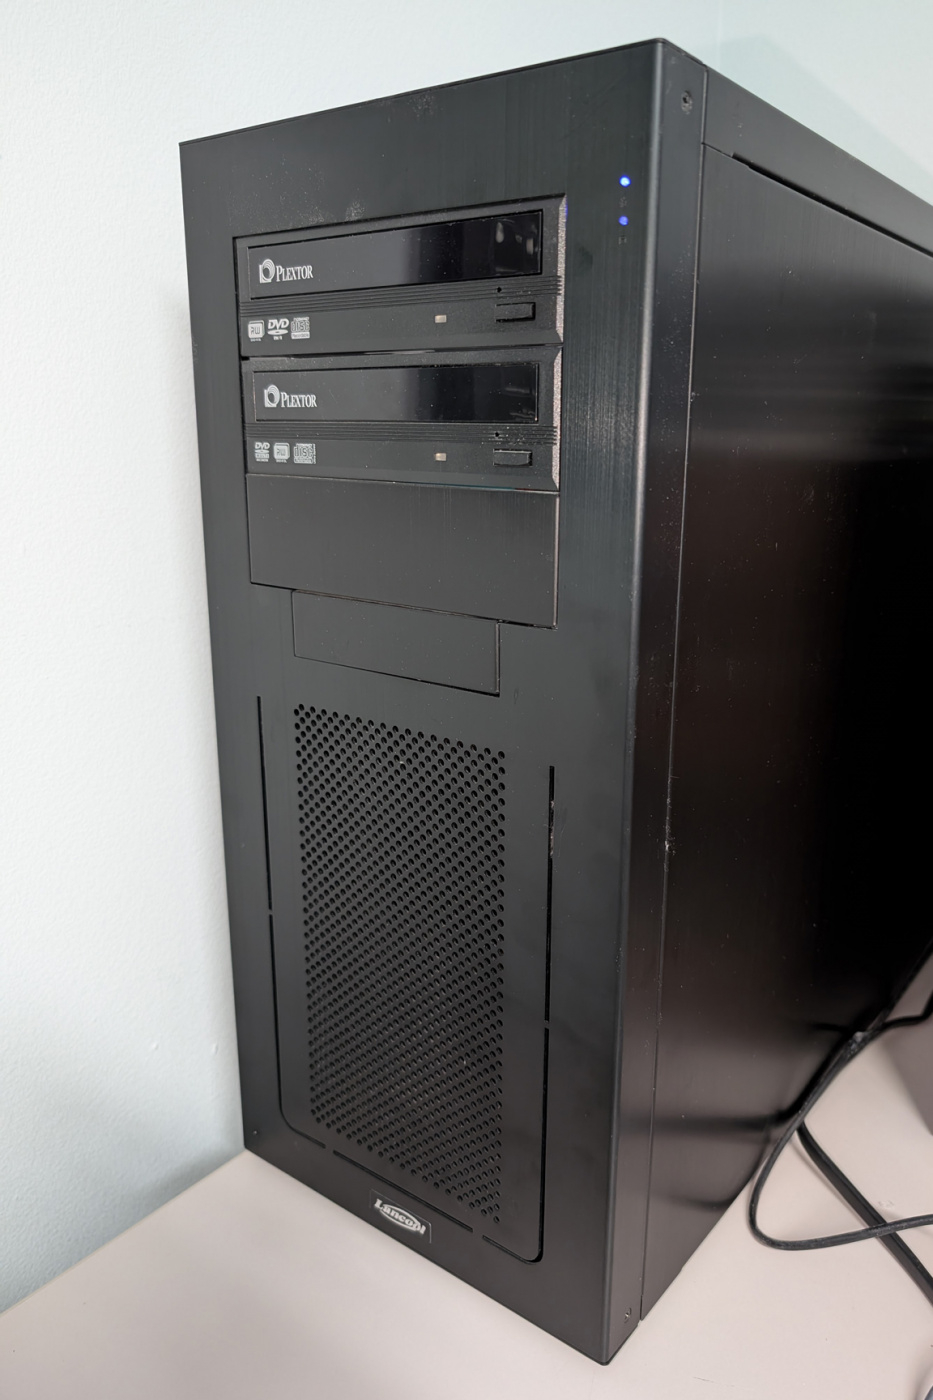
My computer case has plastic clips in each corner on the front that hold the front panel on. Over time they've gotten brittle and just break when you pull the front off to clean the filters. Making replacements are just what 3D printers are for.
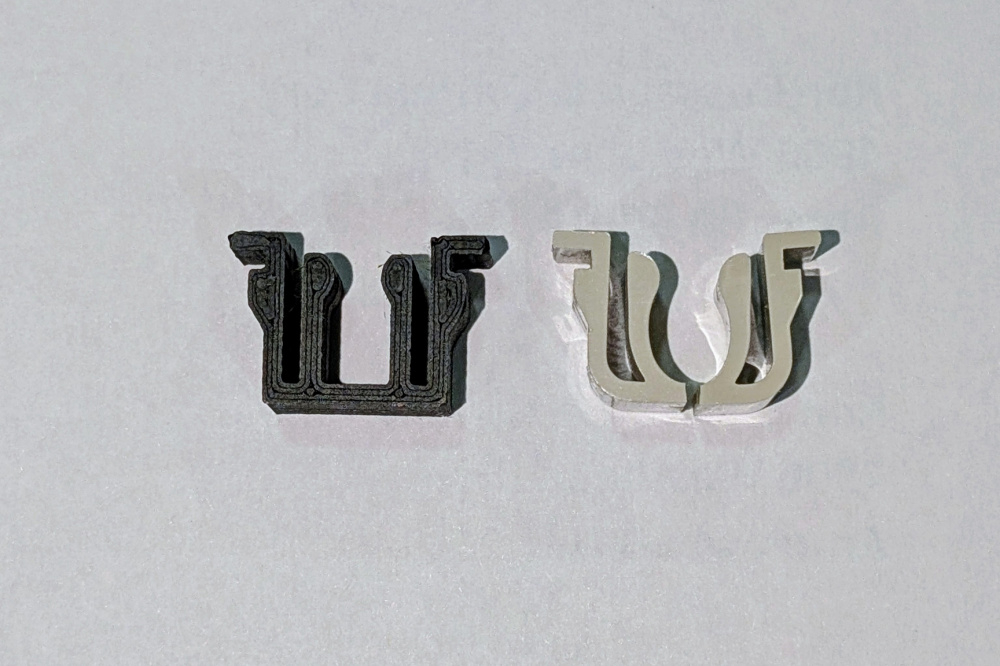
The original latch is on the right. I didn't make an exact copy because I'm not good enough with CAD to do all the fancy curves. My simplified version works just fine.
Ron-great job!
When I have to replicate parts like this I use a flat bed scanner to get a PDF scan of the profile I need. Once I have a good scan I use Convertio to convert the PDF into an SVG. SVG should easily port into any CAD software.
I have used a scanner years ago, there was a large learning curve, and the resolution was not what I needed. I imagine they are much better now than they were 5 years ago.
A 3D printer would be perfect for making the small wedges that I need for my Micro Grand Utopia speaker project. I need a total of 8 small wedges. Currently, I am attempting to make them out of hard maple stock that I had left over from another project. I made a custom 4 degree beveling fixture and am attempting to grind them to shape with my 6x48" belt sander. If this attempt fails, would one of you mind 3D printing them for me? I can make a drawing with precise dimensions in sketchup or photoshop.
Seems like the quality of 3d printers has come along way. The old ones I had / sold I was fixing them more than printing. Would be a nice thing to have if they are reliable now.
I have an Elegoo neptune 3 pro FDM printer and a new Elegoo sla printer. They are both great printers that almost never fail and need very little from me. The neptune has only had 1 part break after a year+ of use (a belt). I have not done any modifications' it just works. I was happy with my ender 3 after LOTS of mods but the stock Neptune is superior. My twin brother has also left his highly modified printerS for a Anycubic Cobra. The new bread of printers is way better than 5-10 years ago. I have printed with multiple SLA resins, PETG, PETG pro, PLA, PLA+ PLA silk, TPU, almost everything you can get and these new machines just print.
@D1PP1N said:
Seems like the quality of 3d printers has come along way. The old ones I had / sold I was fixing them more than printing. Would be a nice thing to have if they are reliable now.
I was searching for info on how best to dry TPU filament (rubbery stuff - great for gaskets) and ran across a YouTube video on the waste of time printing with TPU. He charted how print speeds for PLA had increased over the years but TPU speeds have hardly changed. He started making test prints on a range of printers and determined that you could indeed print TPU at much higher speeds. He attributed that to the fact that extruders had been much improved over the years. He had one printer that he didn't know if you could take the extruder apart.
I'm running an Ender 5 Pro with an upgraded Swiss Micro direct drive extruder and it really is much more reliable than the stock extruder.
Now that I don’t have a CNC anymore it would be nice to make templates. I can see a lot of uses for TPU (cabinet feet (embed washer inside), gaskets, orings), I had some abs trim rings made for speaker replacement on my Tesla and they looked great. I have a few things I could make for work if it can print a heat (180-200 degree F) stable filament. He had a Bambu labs printer. Looks like their prices went down recently. What are you printing with the resin printer? Is that for mostly HD smaller printers?
Comments
Anyone using filament dryer boxes?
I wouldn't buy one again. Yes they work, but you only need it if you didn't store your filament correctly. If you do get a roll of filament "wet" put it back in the bag with the dryer bags for a week or two. You can also use your bed heater to dry your filament.
I save all the dryer bags that come with filament and add a few when I put filament back in the bag. Those little dryer bags can also be baked to get them dryer.
Point being save your money.
I use the large freezer zip-loc bags and got a 50 pack of desiccant packs from Amazon.
Edit: Just to be clear, I only use 1 or 2 of the packs at a time, not 50")
I have this one from Sunlu.
https://amazon.com/Official-Filament-Upgraded-Dehydrator-Accessories/dp/B0BX6FR311
It works well and I have had new filament that is very wet right out of the box (50% RH) . Humidity isn't much of a problem in Iowa in the winter because the furnace and the weather dry the house out. Summer is a different story.
The only problem I've had with the dryer is when I used it to dry some TPU and forgot to set the temp back down for PLA. It got hot enough to make the PLA stick to itself on the spool which caused the extruder gear to strip the filament and quit printing.
I have a friend who uses a counter top toaster oven. They can be picked up cheap at places like Goodwill.
I saw the device on the left with the threaded brass insert, and assumed that you had duplicated the threaded insert in the 3 d print. I now see that is not the case, the print appears to have a straight hole.
Look up "Ruthex" heat set inserts on Amazon. I have bought some, as well as solder tips and accessories but haven't actually used any. I also saw a YouTube video where they were testing several different brands of heat set inserts and they also included just screwing directly into PLA. The direct screw into PLA actually held a LOT of weight, so for little waveguides and such, I don't even need the fancy inserts.
Gotcha! I've never tried threads in a 3D print. I designed pockets for the 1/4-20 nuts on the back side of this piece. We have a few people on staff who regularly over-tighten and break things, so I wanted to make it as durable as possible.
I recently printed a spool winder for filament spools that had threads. I got the files from the internet so I don't know if they did anything special but the threads and nut work fine.
I had my first & second print failure. The first on Sunday was just a raft that didn't stick well, so I stopped the print and started it again. It printed just fine. The second fail was overnight. It got about 75% complete and then nothing. The screen said complete, but obviously it wasn't putting down any material. Not sure yet if it's jammed extruder gears or if the hot end is clogged up.
-- It was a clog. Heated it up 240 and that cleared it.
My computer case has plastic clips in each corner on the front that hold the front panel on. Over time they've gotten brittle and just break when you pull the front off to clean the filters. Making replacements are just what 3D printers are for.
The original latch is on the right. I didn't make an exact copy because I'm not good enough with CAD to do all the fancy curves. My simplified version works just fine.
This is the new latch installed.
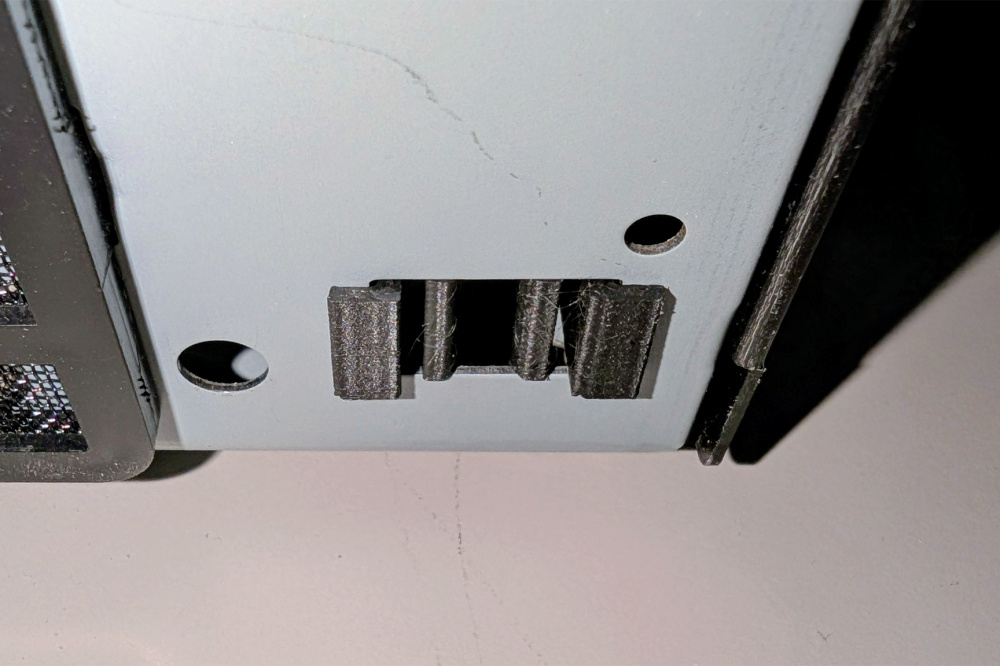
This is the post that mates to the latch.

All fixed.
Great job, Ron (check your 1st pic and orientation description again - L vs R).
I actually had it right in my first draft and changed it. It's late.
No worries, mate - just reducing confusion - great work - I envy you kids . . .")
Ron-great job!
When I have to replicate parts like this I use a flat bed scanner to get a PDF scan of the profile I need. Once I have a good scan I use Convertio to convert the PDF into an SVG. SVG should easily port into any CAD software.
https://convertio.co/
Did anyone try any 3d scanner?
I have used a scanner years ago, there was a large learning curve, and the resolution was not what I needed. I imagine they are much better now than they were 5 years ago.
A 3D printer would be perfect for making the small wedges that I need for my Micro Grand Utopia speaker project. I need a total of 8 small wedges. Currently, I am attempting to make them out of hard maple stock that I had left over from another project. I made a custom 4 degree beveling fixture and am attempting to grind them to shape with my 6x48" belt sander. If this attempt fails, would one of you mind 3D printing them for me? I can make a drawing with precise dimensions in sketchup or photoshop.
Nice fix, Ron!
Bill, just sketch it on paper with dimensions I will get it drawn in fusion360.
Great! Will do.
I would volunteer, but my skills and print settings is a bit sketchy... But getting there...!
Let me know if I can help.
I found some STL files for printing pegboard hooks.
https://thingiverse.com/thing:2108670
Thanks! Those will be REAL handy. Often the standard hooks aren't quite what I need.
Seems like the quality of 3d printers has come along way. The old ones I had / sold I was fixing them more than printing. Would be a nice thing to have if they are reliable now.
I have an Elegoo neptune 3 pro FDM printer and a new Elegoo sla printer. They are both great printers that almost never fail and need very little from me. The neptune has only had 1 part break after a year+ of use (a belt). I have not done any modifications' it just works. I was happy with my ender 3 after LOTS of mods but the stock Neptune is superior. My twin brother has also left his highly modified printerS for a Anycubic Cobra. The new bread of printers is way better than 5-10 years ago. I have printed with multiple SLA resins, PETG, PETG pro, PLA, PLA+ PLA silk, TPU, almost everything you can get and these new machines just print.
I was searching for info on how best to dry TPU filament (rubbery stuff - great for gaskets) and ran across a YouTube video on the waste of time printing with TPU. He charted how print speeds for PLA had increased over the years but TPU speeds have hardly changed. He started making test prints on a range of printers and determined that you could indeed print TPU at much higher speeds. He attributed that to the fact that extruders had been much improved over the years. He had one printer that he didn't know if you could take the extruder apart.
I'm running an Ender 5 Pro with an upgraded Swiss Micro direct drive extruder and it really is much more reliable than the stock extruder.
Now that I don’t have a CNC anymore it would be nice to make templates. I can see a lot of uses for TPU (cabinet feet (embed washer inside), gaskets, orings), I had some abs trim rings made for speaker replacement on my Tesla and they looked great. I have a few things I could make for work if it can print a heat (180-200 degree F) stable filament. He had a Bambu labs printer. Looks like their prices went down recently. What are you printing with the resin printer? Is that for mostly HD smaller printers?
There are high temp filaments. I have no experience with them but they are available.
A friend of mine prints his own drone parts and is going to order some of this.
https://all3dp.com/4/prusa-drops-tough-pp-glass-fiber-filament-so-what-can-you-do-with-it/
I found this with Google.
https://wevolver.com/article/high-temp-3d-printer-filament-material-and-hardware-considerations
I printed TPU gaskets for some Peerless 6.5" woofers with truncated frames.