Site Links
Howdy, Stranger!
It looks like you're new here. If you want to get involved, click one of these buttons!
Quick Links
Categories
In this Discussion
Who's Online (0)
Baffle issues: Vifa5 2 way with NE149 and NE25

** Edit: updated title.**
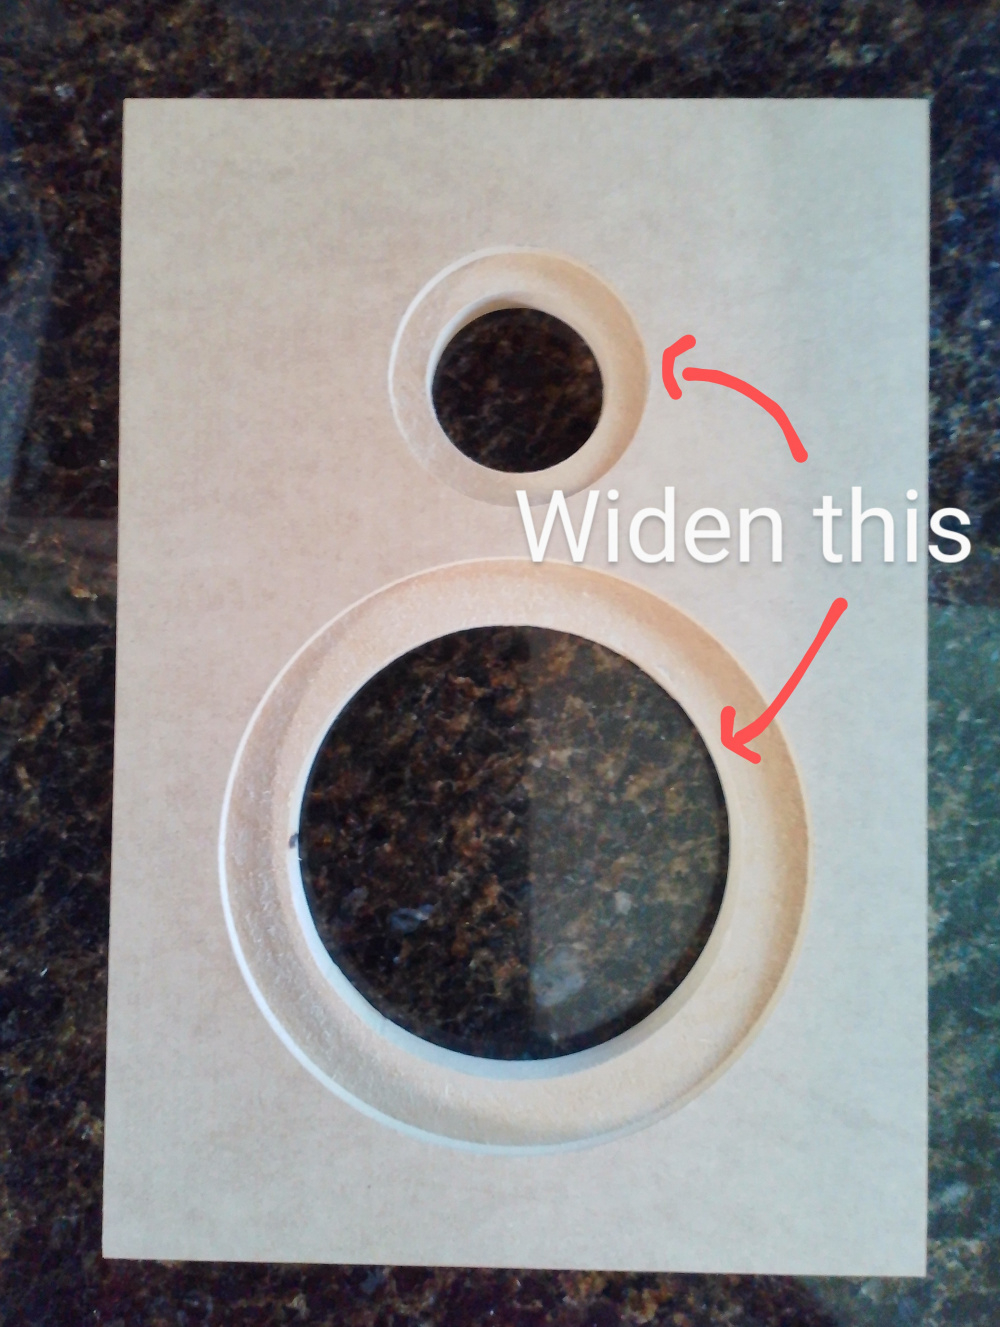
So, I cut a baffle. Turns out I got both the tweeter cutout and the woofer cut out wrong.
The tweeter cutout is good, but the rebate for flush mounting the flange is super tight -i can just about press fir the tweeter. I need to widen it just a smidge, so I can take out and install the tweeter and also have a little wriggle room for paint.
The woofer has the other issue, the rebate for the flush mount is good, but the through hole is small, so I can't seat the woofer, getting stuck on the frame ribs, so I need to widen it a bit.
Any good ways of doing so?

Comments
Maybe a rabbet bit on tweeter, careful jigsaw work on woofer.
Other options are to recut baffles, or cut some the holes and start over.
The woofer hole can be cut from the backside using a large bearing on a small diameter flush cutting bit. Kind of a reverse rabbiting bit setup.
For the tweeter, if it's that close, I would try sanding with something like 80 and then 120 grit. Just try to keep it even.
For the woofer I use a rabbet bit with the bearing running along the inside of the cutout. This allows me to widen the hole but only about 3/4th of the depth needed, leaving a little lip at the old (too small) diameter. Then I flip it and use a flush trim but to trim off that lip flush to the wider rabbeted hole.
Final option is to redo the baffle. I'll try messing with this and see what happens. Worst case I'll start over. Woofer hole using the rabbit bit at 1/8" would work and then flush trim. There is plenty of clearance there. The tweeter one I'll need to see. It works for now, but any sort of paint, it doesn't. Too big and it'll have an ugly gap....
I've been there more than once. I tape down the baffle and the round cutouts. Center the round cutouts as best as possible, and then re-rout to the larger size.
If you cut with a 1/4" bit, you can use the shank of other bits to assist centering.
For the T rabbet, a rabbeting bit set should get you close and you can always tune it by adding tape to the bearing.
Cut a hole the size you need and use it as a template with a top bearing router bit. This is the ONLY way I cut holes (other than the BFR3000(CNC)) It gives you the chance to check the size of the hole before you screw up a baffle. I started doing it this way over 10 years ago and Im never going back.
If it’s that close for the tweeter I agree with Dave. I would just sand it. I use the piece of wood that was cut out from the center of the tweeter hole, glue sandpaper around the outer diameter and use it to sand the opening wider
For the woofer I just use a dremel with the sanding bit. It doesn’t have to be pretty, just has to fit. Mark out on the piece where you need to sand to
Tweeter recess: Just wrap sandpaper around something round with a decently sharp edge to get down in the corner and work your way around in there by hand. Doing it by hand makes it pretty hard to overdo as long as you check as you go. I've had to do that for 12" woofer recesses.. That was tedious.
I'd just freehand the inner hole with a router and non bearing bit to fix it. Noone will see it but you. Just go slow to keep it from getting away from you. Can mark out a quick guide line with a pencil tip held against your thumb and run your thumb along the opening. Helps as a reference to not take out too much material. Heck.. some folks use a jigsaw to cut the inner opening, which tends to be less than perfect.
+1 on most of the above recommendations. My procedure is similar to Ken. I don't make a template, per se. I set up two routers to make the hole; one router with circle cutting guide to make the through hole and then another router with circle cutting guide to make the rebate. I dial both routers in using scrap lumber. Then I do the actual baffles. If, after painting, the rebate is too tight, I follow Impious's or Drew's suggestion of gluing sandpaper to the driver cutout and then carefully widening the rebate. If a driver basket is too tight to fit the cutout, I slowly widen the hole with a round hand file until it drops in place.
EDIT: Above was poorly worded. I should have said "For most builds, I don't make a template, per se."
Creative group of ideas > for and from us that didn’t measure twice (or cut in a scrap board first)…
For the tweeter cut a new hole in a scrap of wood the diameter of the tweeter flange and tape it to baffle with double stick tape and route the rebate with a top bearing router bit. Do the same for the woofer but cut the through hole from the back.
Ron
With a circle jig of almost any kind you have a small bump when you start the plunge. Templates don't do that.
With a circle jig if you cut out the center you can not make the hole bigger or a rebate deeper.
Templates alow you to do both.
I have even recut finished baffles when the paint made it too tight.
Circle jigs can't do that.
Need a 93.24mm hole a template can do that, repeatably; no limitations caused by detents or holes.
Come to the temple of template and repent of your ways!
All kidding aside the idea of using a circle jig on a nice hardwood baffle scares the crap out of me.
On hard wood baffles I often line the inside of my jigs with tape and then take the tape off so I can do a final pass only taking the thickness of tape on my final cut.
On MDF templats I plan on using a lot I coat them in shellac, the bearings don't dent the mdf as quickly and the double sided tape sticks really well.
If you made it this far welcome to the faith bretheren
I agree with most of your points, Ken. I have a large stack of templates that I use for various repeat driver cutouts, however, I also use my circle cutting guides for most of my builds because creating a custom, accurate template takes more time. I concede that a template is the most accurate way to go. But a circle guide can be just as accurate if you do quick test cuts on a sacrificial handy-panel before making your final cut.
Edit: My previous post was poorly worded. I should have said "For most builds, I don't use a template, per se."
Since switching to the metric jasper jig I have 1mm accuracy depending if I use a 6mm or 5.5mm bit. Good enough for me.
I agree with what you say here. I draw the conclusion that I should never make a baffle from hardwood.")
I don't use my jasper jig anymore. I use this Milescraft continuous jig that has imperial and mm markings. I'll migrate to templates eventually though.
https://a.co/d/9635iFK
didn't realize till now how big 1/8 is compared to 1 mm, since i need to go the distance of a smidge!
0.125 inch = 3.175mm and this is on one side, the entire circle then gets to be 1/4" or 6.35mm bigger...
going to try it out, and make a new baffle in case it gets too bad
I have both metric and imperial.
I just ordered one of those Milescraft router jigs that David linked. Going to use it to start making templates... lol
I still use the infinitely adjustable circle jig I made a few years ago.
InDIYana Event Website
Well, I messed it up and am going to redo the baffle. How much allowance do you keep for paint. The tweeter flange cutout is press fit tight, so exactly exact. How much typically allowance do you keep for primer and paint and all? 1mm in the diameter or 1 mm on each side so 2mm in Diameter? or 1/32 on each side or overall 1/32" which is 0.8 mm
Or should i go smaller? 0.5mm or 0.25mm on the radius (each side)? so the tweeter fits properly with paint and primer and there is no ugly gap aound
Two things, you need to slightly oversize the hole of course, but you also need to "break" the edge of the rebate. I use sandpaper and put a chamfer along there, when paint hits it will swell. This helps keep your OD constant. Does not take much of a break - but it is necessary.
Also - don't be afraid of sandpaper to tailor your driver rebates.
Like this:
Thanks JR, just breaking and smoothening the surface with sandpaper at an angle will be good?
This will go into a cnc. I ended up widening the hole a bit too much, hence the need to redo - It's not too bad, but i wanted to dial it in properly so I have an offset measurement for later builds and not end up too tight or too loose.
I measured the tweeters with calipers, so ended getting so exact that they were press fit!
Hiting the exact dimension is very hard to do, 1mm on each side is normally pretty good for a tweeter. One thing that you will notice is that mdf will compress during machining. A 3inch hole after cnc machining will be undersized after the mdf relaxes. How much the mdf compressis during cutting is really hard to compensate for.
Back to my love of templates. You can run the router around the template 2 times cutting away the material that may have compressed on the first pass. Another thing that is happening is the cut mdf dust is getting shoved into the spongy end grain of the mdf. I often use a scraper and drag it along the edge to bump out some of the mdf dust. I do the same thing for all my machined joints just trying to make sure that the glue is getting to the mdf and not just stuck to a barrier of dust.
When working with stamped baskets you need to measure lots of sections and cut to the largest dimension. I have had stamped frames be more than 1mm out of round on a 6 1/2 inch driver (metric and standard in the same sentince. America!).
Good tips ken. What do you make the templates out of? I'll start saving the driver cutout discs that I can wrap sand paper around to creep up on allowance... At some point good enough will be good!
Typically I use 1/2 mdf but have used almost anything I can find. I have used phenolic, lexan, aluminum, and UHMW.
This is what I got so far with the new baffle: