I've been using spray adhesive recently (and IT IS nasty stuff, but works great) to line my speakers with felt. By the time I'm done my fingers tips look like mittens (sort-of) and the instructions say wash hands after use (no shit). By that time soap and water ain't going to do -er. In the past I've tried paint thinner but for some reason I tried some garage door lube - spray grease, and it worked fairly well. Guessing (?) as its a petroleum product it cuts the glue, and a bit nicer cleaning the grease off vs paint thinner (or gas).
I spray on all of my adhesives, and my fingertips all always look like mittens. I use a Solvent based wax and grease remover. I started wearing gloves again as the price has come back to earth.
"In addition to contact dermatitis, petroleum distillates can be contaminated with carcinogens which are absorbed through the skin, potentially leading to harmful levels of toxins in the body or even cancer."
Clamp Rack! Not my idea, pretty much followed THIS.
The speaker cabinets have been sitting there since 2023. They are for a MLTL Paul K. designed for me in 2020 (!) and I was trying to get done by InDIYana 2023, before I decided to enter the Tweeter Yoga theme competition. Tang Band W6-1621 and SB29RDNC. I think I will try to get these done by CSS Detroit 2025.
I repurposed an old Craftsman rolling tool cabinet for all my crossover parts. I got tired of juggling multiple plastic totes that never seemed to have enough space. I am a little worried about the bottom drawer with all the inductors. I guess time will tell if the drawer slides are up to the task.
Nice collection. I need to get better organized as well. I'm still piling most of my unused parts in several old mouser boxes. So now you have to tell us what make and model of reel-to-reel that is lurking in the background. Is this machine fully operational?
That's a Pioneer RT-909. I picked it up at an estate sale and everything seems to be working. The guy was an engineer who repaired audio gear and had a ton of nice vintage pieces.
Just made a fancy "Y" jig for taking the 3 measurements for AC Offset, reverse null, etc....
Took an old gum/candy container, a SPST, a DPDT, some leads and a pair of banana jacks to put it together in about an hour. Input goes to DPDT, + to one pole, - to the other. X wired between outputs for normal or reversed polarity for tweeter, center off position. Inputs come off of DPDT through the SPST for woofer positive, and allows on or off only. Leads are 3' long and labeled with flags at both ends, meant to drop through port to drivers.
@ugly_woofer said:
Made a stack of zero clearance table saw inserts.
I need to make at least two of those and one insert for my router table as I aquired an 1-1/2" roundover bit that won't work with what I have. Nice work Nick.
Installing threaded inserts... Did in past where added dab of epoxy but was kind heavy/bulky and feared clogging the threads with squeezeout but luckily everything worked out.
Any other recommendations? This into MDF this time, wondered if loctite threadlocker hold well enough since have plenty of it from electronic builds.
Ahhh, the jig thread!
This worked great for beveling a baffle. I used 4 angled supports. The first and last were spaced equally from the end of the main box, this allowed for reversal to do either side. The top was then layed out for where the bevels would be located. Allowed over hang for proper router stability. Once I figured out the positioning of the guides and screwed into place, I removed each screw separately and drilled a pilot hole through to the other side. This will facilitate swapping the guides to the other side when the top panel is rotated and flipped for doing the other side bevel. The opposite side of the top panel (from the routed guide) will be flush to the main box for both routing procedures.
@traw said:
Any other recommendations? This into MDF this time, wondered if loctite threadlocker hold well enough since have plenty of it from electronic builds.
No idea if the thread locker would work but I have some gel super glue (maybe DAP brand?) that I think both Lowes and Menards carry that might work.
@6thplanet said:
Ahhh, the jig thread!
This worked great for beveling a baffle. I used 4 angled supports. The first and last were spaced equally from the end of the main box, this allowed for reversal to do either side. The top was then layed out for where the bevels would be located. Allowed over hang for proper router stability. Once I figured out the positioning of the guides and screwed into place, I removed each screw separately and drilled a pilot hole through to the other side. This will facilitate swapping the guides to the other side when the top panel is rotated and flipped for doing the other side bevel. The opposite side of the top panel (from the routed guide) will be flush to the main box for both routing procedures.
Looks like you have more $ in wood (re nice plywood) for that one jig than I have in my last 8 or so builds combined. lol
Though these days I chalk up money burned as a chosen entertainment cost - like f', a hipster touted food stop 40 bucks down the hole for a lunch, if lucky. But yeah, have to keep track of those nickels n dimes - if people still remember what coins are nowadays.
@traw said:
Though these days I chalk up money burned as a chosen entertainment cost - like f', a hipster touted food stop 40 bucks down the hole for a lunch, if lucky. But yeah, have to keep track of those nickels n dimes - if people still remember what coins are nowadays.
I can remember back in the day when I had a cushy union job working for the utility company in the electric meter department. I would pack a lunch every day. I had to attend some kind of training and I ate lunch with some people because they asked me to. The cheapest thing I could find was 7 bucks. So I ordered it, and I felt guilty for spending that money just to make a turd. I am still somewhat like that.
Reposting over in this thread at the request of some other members. I posted an initial version of this over in the 3D Printing thread.
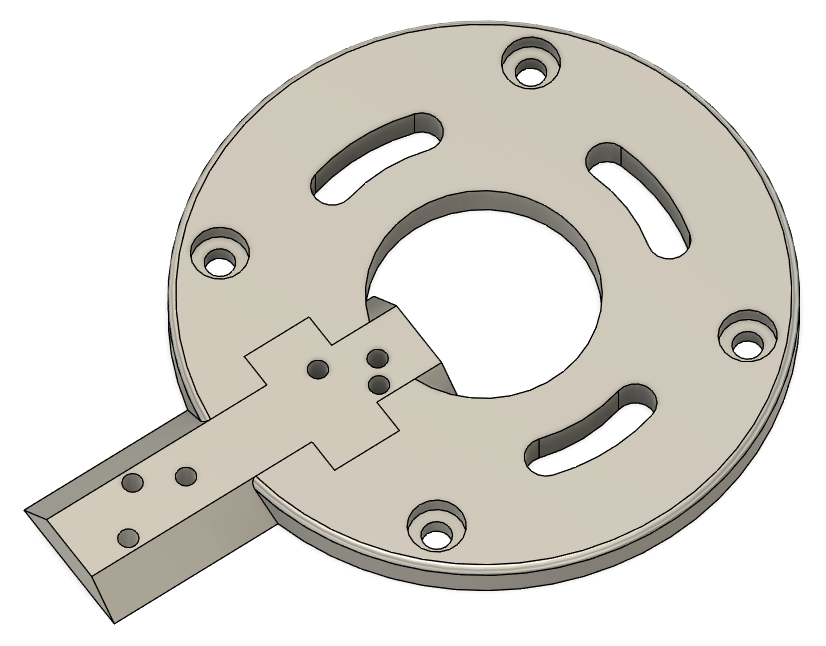
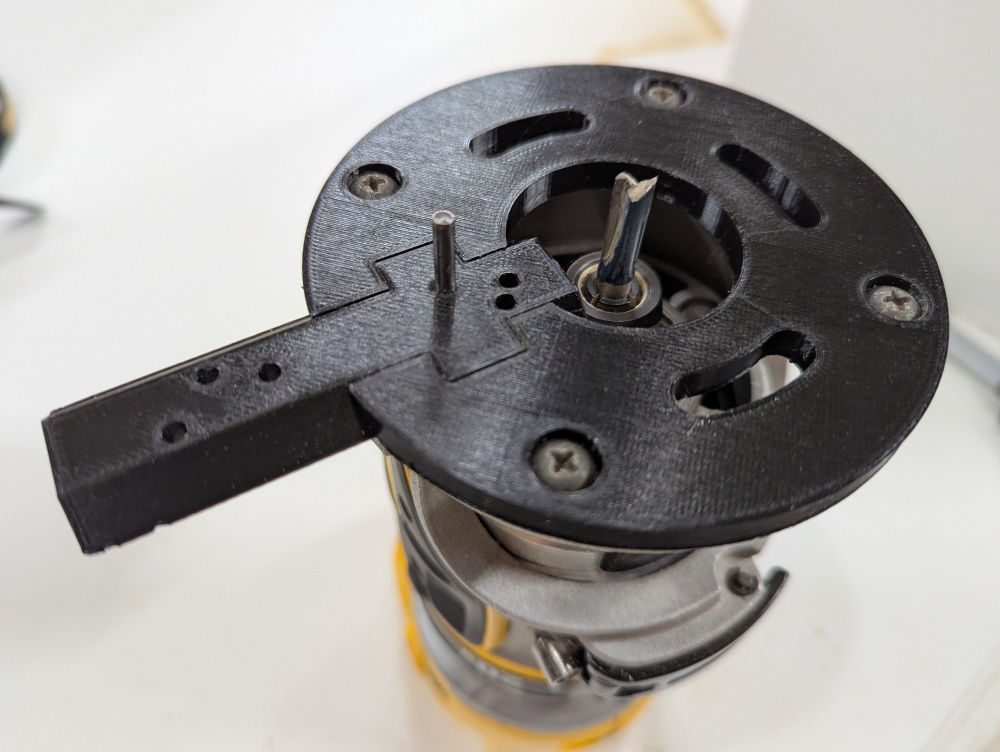
A couple nights ago I came up with an idea for making a 3D printed circle jig for my Dewalt DCW600B battery powered router. I came up with a parametric model which can take the OD of a couple drivers (tweeter and woofer) and the cutout diameters of each. The router bit's diameter is also able to be specified, and I even made a separate parameter for both the flush mount bit and through-hole bit. Those parameters will generate a piece that fits into a base piece and accepts a 1/8" pin. Each driver's diameters will generate a hole for the through-hole cut (these will always be along the centerline of the "arm" piece). Additional pin holes are generated for the flush mounting passes, and the number of these will vary depending on the size of the router bit and the size of the overhang per driver.
The first iteration seemed to fit together pretty well, but had a few issues. The mounting holes for the base plate weren't quite right, and the sharp 90* edge of the base plate left the surface marred on my test piece. So I fixed those mounting holes and added a slight roundover to the base plate on v2. The driver tolerance parameter was also too big, so I cut that down in the second version of the "arm". I'm testing this on a speaker I'm developing with a Peerless XT25SC90-04 and a RS150P-4A, so all images below are for those drivers.
The model with 1/4" bit specified for the flush trim cuts:
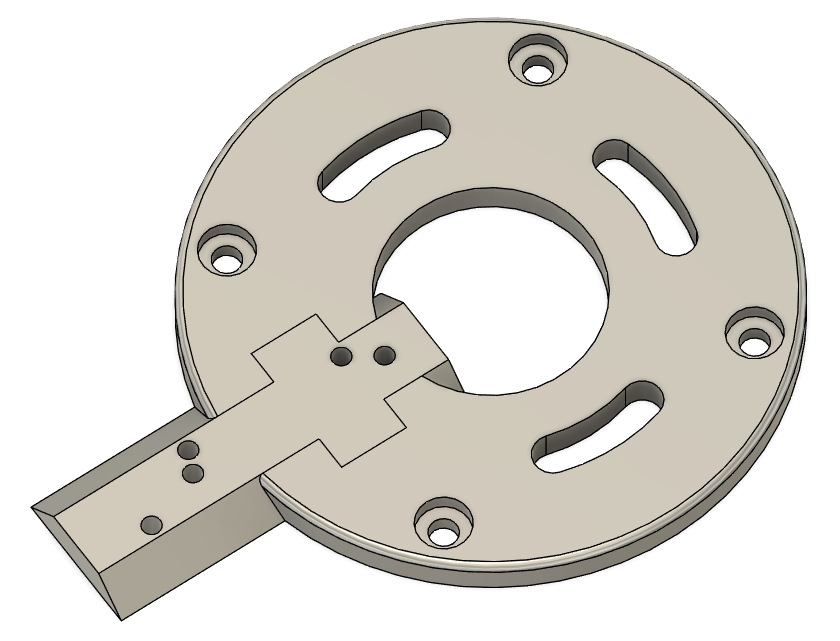
And the same model with a 1/2" bit specified instead. Notice that there's fewer holes and they're spread out differently, but the two holes along the centerline are in the same locations because the through-hole bit diameter didn't change (1/4" in both):
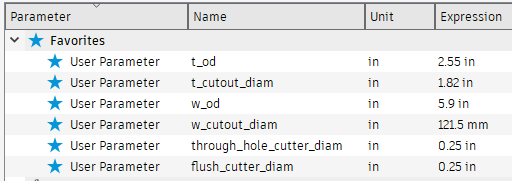
The parameters for making a custom arm piece:
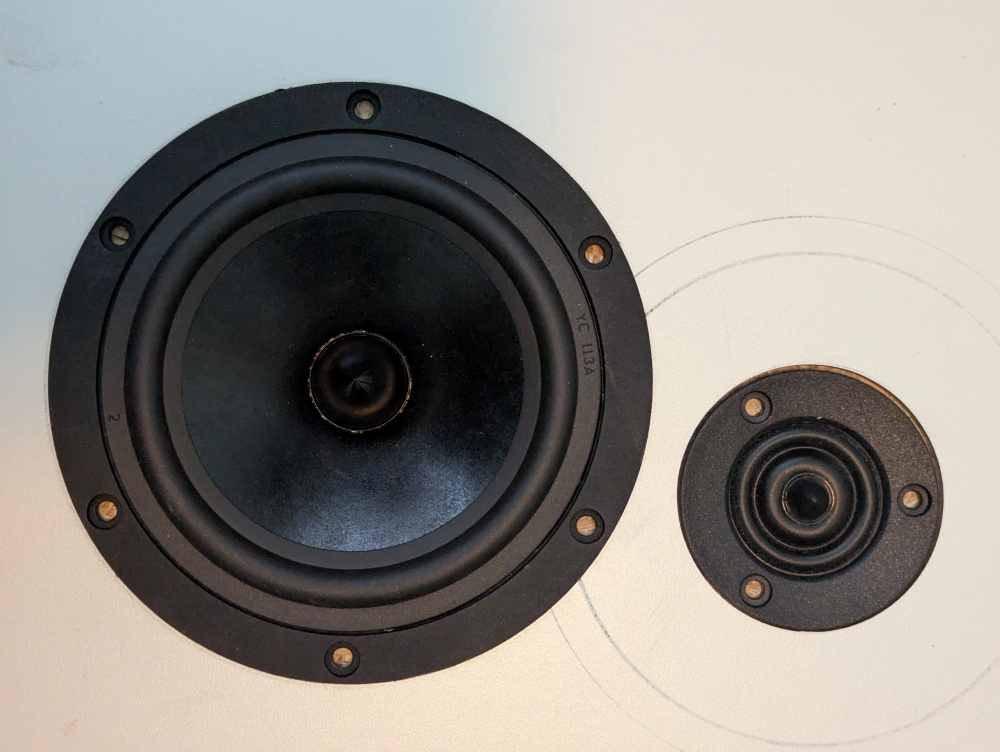
And the initial test baffle. Notice the slop in the tweeter hole, and the circular pattern around the tweeter from the original base plate. These issues were fixed in subsequent prints, and the woofer hole came out with a perfect fit:
The original jig attached to my router:
I'd be happy to share the Fusion360 model with anyone, and could also generate driver-specific STL files pretty easily if anyone has requests.
@Timsie said:
Reposting over in this thread at the request of some other members. I posted an initial version of this over in the 3D Printing thread.
A couple nights ago I came up with an idea for making a 3D printed circle jig for my Dewalt DCW600B battery powered router. I came up with a parametric model which can take the OD of a couple drivers (tweeter and woofer) and the cutout diameters of each. The router bit's diameter is also able to be specified, and I even made a separate parameter for both the flush mount bit and through-hole bit. Those parameters will generate a piece that fits into a base piece and accepts a 1/8" pin. Each driver's diameters will generate a hole for the through-hole cut (these will always be along the centerline of the "arm" piece). Additional pin holes are generated for the flush mounting passes, and the number of these will vary depending on the size of the router bit and the size of the overhang per driver.
The first iteration seemed to fit together pretty well, but had a few issues. The mounting holes for the base plate weren't quite right, and the sharp 90* edge of the base plate left the surface marred on my test piece. So I fixed those mounting holes and added a slight roundover to the base plate on v2. The driver tolerance parameter was also too big, so I cut that down in the second version of the "arm". I'm testing this on a speaker I'm developing with a Peerless XT25SC90-04 and a RS150P-4A, so all images below are for those drivers.
The model with 1/4" bit specified for the flush trim cuts:
And the same model with a 1/2" bit specified instead. Notice that there's fewer holes and they're spread out differently, but the two holes along the centerline are in the same locations because the through-hole bit diameter didn't change (1/4" in both):
The parameters for making a custom arm piece:
And the initial test baffle. Notice the slop in the tweeter hole, and the circular pattern around the tweeter from the original base plate. These issues were fixed in subsequent prints, and the woofer hole came out with a perfect fit:
The original jig attached to my router:
I'd be happy to share the Fusion360 model with anyone, and could also generate driver-specific STL files pretty easily if anyone has requests.
That's a great idea. I 3D printed a router jig with a sliding arm for infinitely adustable radii, but setting it up still requires some eyeballing. I never thought about 3D printing different arms for specific drivers. They're so small they'd be super cheap to make and easy to store.
Comments
Yes.
In the bottom pick the jig is turned around and blade is tilted to 45.
I've been using spray adhesive recently (and IT IS nasty stuff, but works great) to line my speakers with felt. By the time I'm done my fingers tips look like mittens (sort-of) and the instructions say wash hands after use (no shit). By that time soap and water ain't going to do -er. In the past I've tried paint thinner but for some reason I tried some garage door lube - spray grease, and it worked fairly well. Guessing (?) as its a petroleum product it cuts the glue, and a bit nicer cleaning the grease off vs paint thinner (or gas).
I spray on all of my adhesives, and my fingertips all always look like mittens. I use a Solvent based wax and grease remover. I started wearing gloves again as the price has come back to earth.
https://www.jfcomponents.com/
I use WD-40 to remove most adhesives.
Careful. Even though it's just occasional use...
"In addition to contact dermatitis, petroleum distillates can be contaminated with carcinogens which are absorbed through the skin, potentially leading to harmful levels of toxins in the body or even cancer."
https://www.manufacturing.net/safety/article/13195527/think-all-heavy-duty-hand-cleaners-are-the-same-think-again
Wear nitrile gloves under your mittens?
Clamp Rack! Not my idea, pretty much followed THIS.
The speaker cabinets have been sitting there since 2023. They are for a MLTL Paul K. designed for me in 2020 (!) and I was trying to get done by InDIYana 2023, before I decided to enter the Tweeter Yoga theme competition. Tang Band W6-1621 and SB29RDNC. I think I will try to get these done by CSS Detroit 2025.
Nice. 55 clamps. Beats my collection of only 22. I need to build something like this. And get more clamps.
I repurposed an old Craftsman rolling tool cabinet for all my crossover parts. I got tired of juggling multiple plastic totes that never seemed to have enough space. I am a little worried about the bottom drawer with all the inductors. I guess time will tell if the drawer slides are up to the task.
Guess that's the break over point of "getting serious" 😛
Nice collection. I need to get better organized as well. I'm still piling most of my unused parts in several old mouser boxes. So now you have to tell us what make and model of reel-to-reel that is lurking in the background. Is this machine fully operational?
TEAC?
That's a Pioneer RT-909. I picked it up at an estate sale and everything seems to be working. The guy was an engineer who repaired audio gear and had a ton of nice vintage pieces.
Don't think so. Teacs typically have black head cover.
Just made a fancy "Y" jig for taking the 3 measurements for AC Offset, reverse null, etc....
Took an old gum/candy container, a SPST, a DPDT, some leads and a pair of banana jacks to put it together in about an hour. Input goes to DPDT, + to one pole, - to the other. X wired between outputs for normal or reversed polarity for tweeter, center off position. Inputs come off of DPDT through the SPST for woofer positive, and allows on or off only. Leads are 3' long and labeled with flags at both ends, meant to drop through port to drivers.
InDIYana Event Website
Thats pretty slick! 👍🏻
Just additionally, the switches are both standard "heavy duty" toggle switches. The SPST is rated 20A, and the DPDT is 10A at 120VAC.
InDIYana Event Website
Made a stack of zero clearance table saw inserts.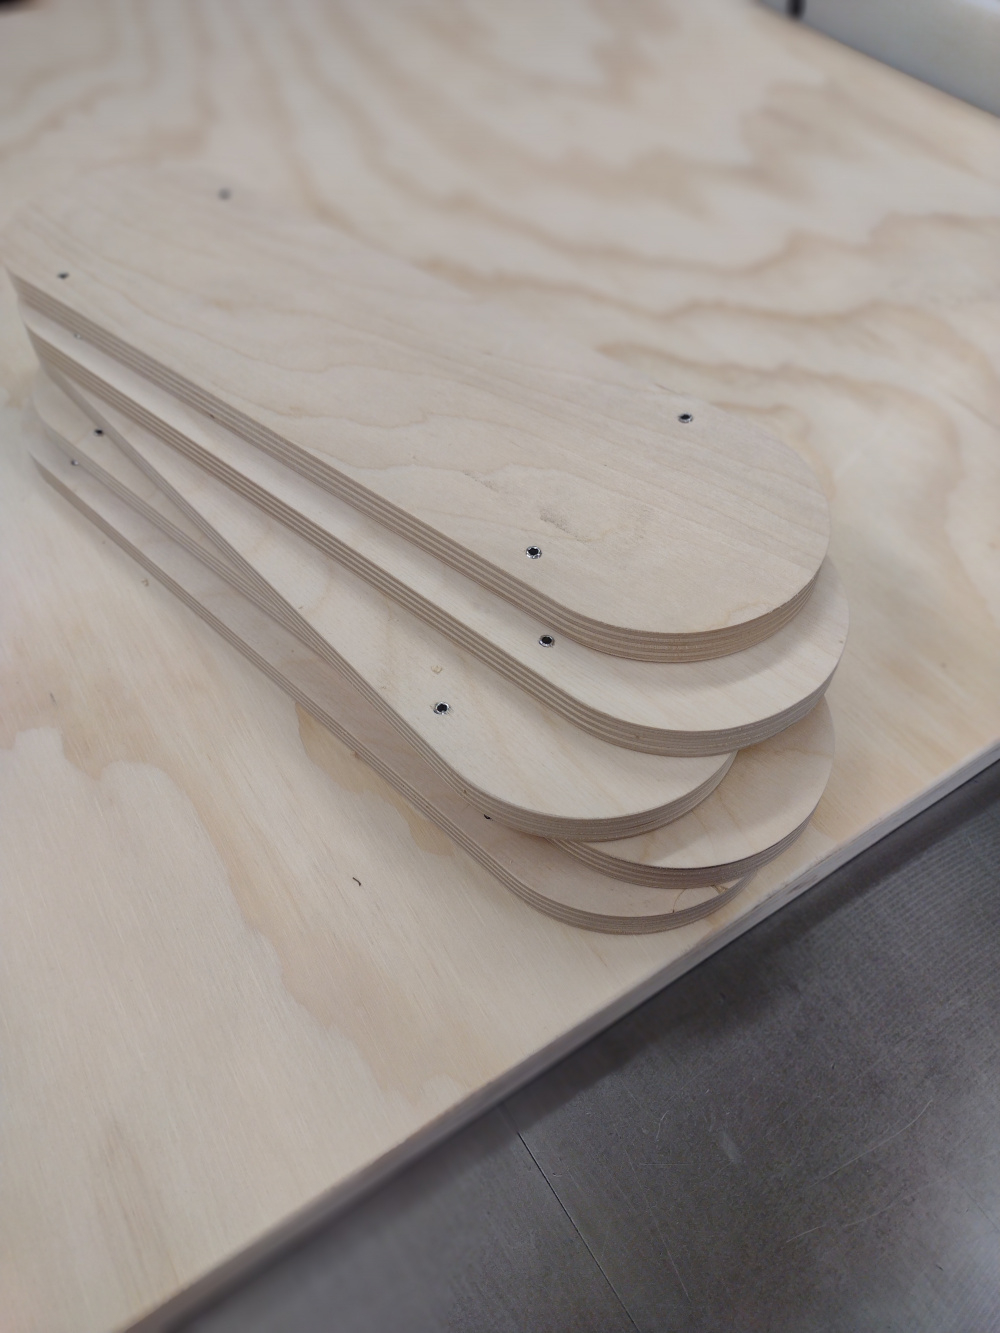
I need to make at least two of those and one insert for my router table as I aquired an 1-1/2" roundover bit that won't work with what I have. Nice work Nick.
Installing threaded inserts... Did in past where added dab of epoxy but was kind heavy/bulky and feared clogging the threads with squeezeout but luckily everything worked out.
Any other recommendations? This into MDF this time, wondered if loctite threadlocker hold well enough since have plenty of it from electronic builds.
Ahhh, the jig thread!
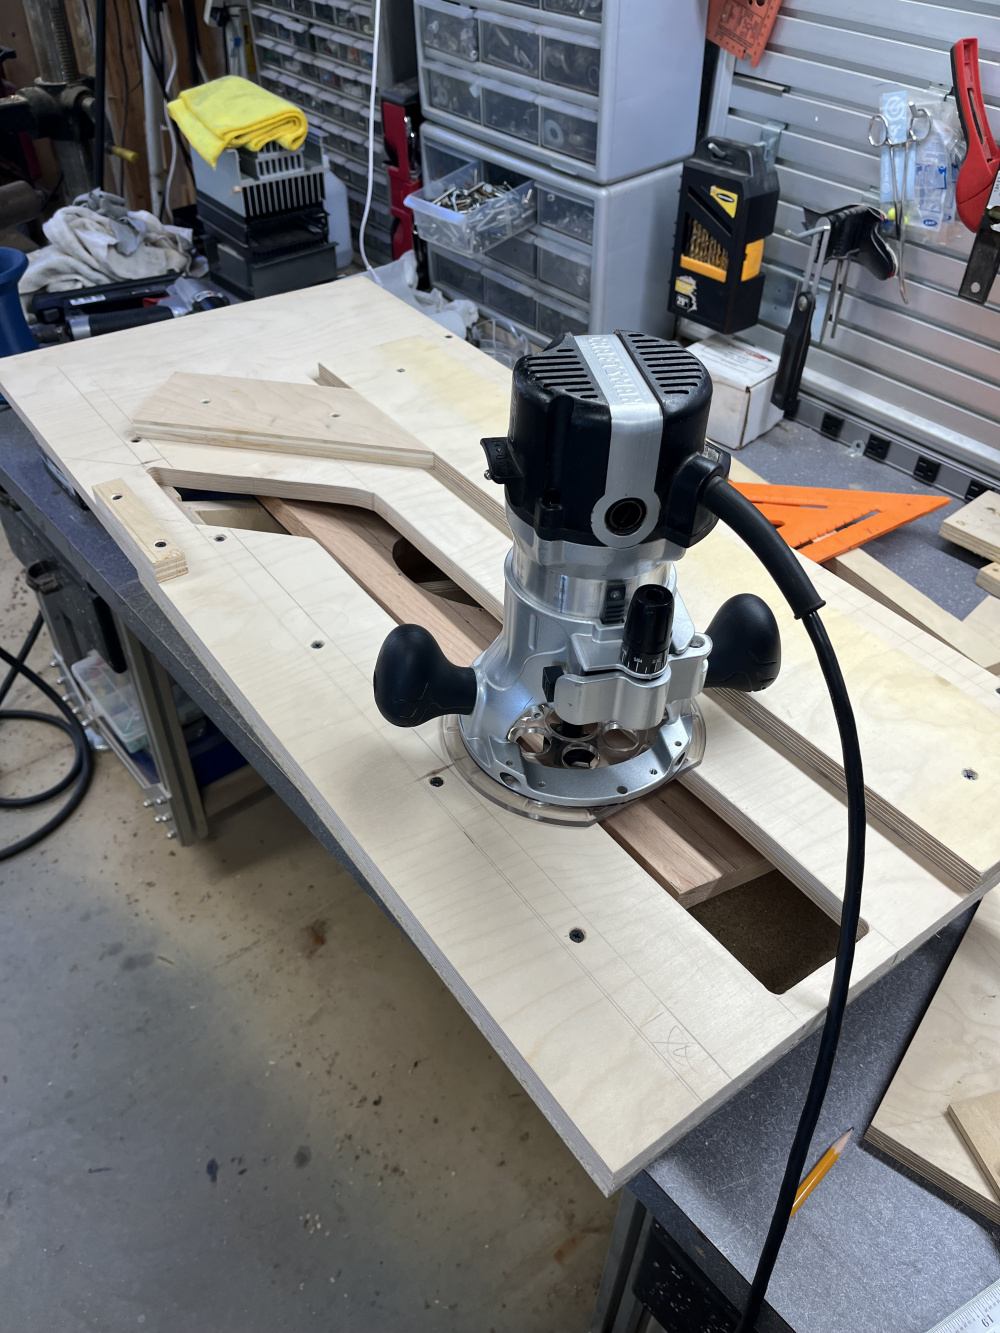
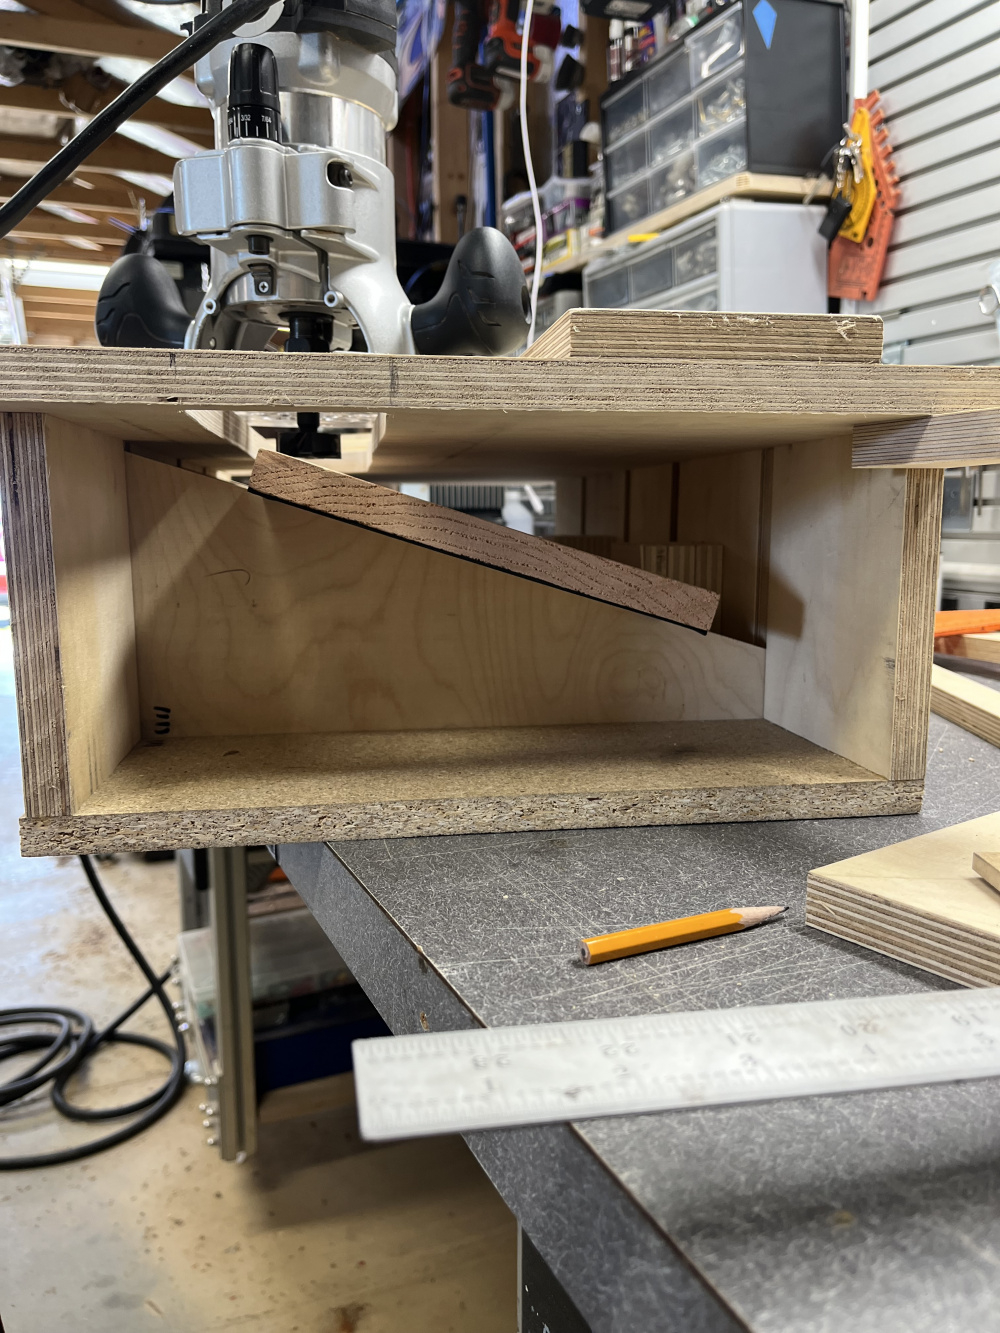
This worked great for beveling a baffle. I used 4 angled supports. The first and last were spaced equally from the end of the main box, this allowed for reversal to do either side. The top was then layed out for where the bevels would be located. Allowed over hang for proper router stability. Once I figured out the positioning of the guides and screwed into place, I removed each screw separately and drilled a pilot hole through to the other side. This will facilitate swapping the guides to the other side when the top panel is rotated and flipped for doing the other side bevel. The opposite side of the top panel (from the routed guide) will be flush to the main box for both routing procedures.
No idea if the thread locker would work but I have some gel super glue (maybe DAP brand?) that I think both Lowes and Menards carry that might work.
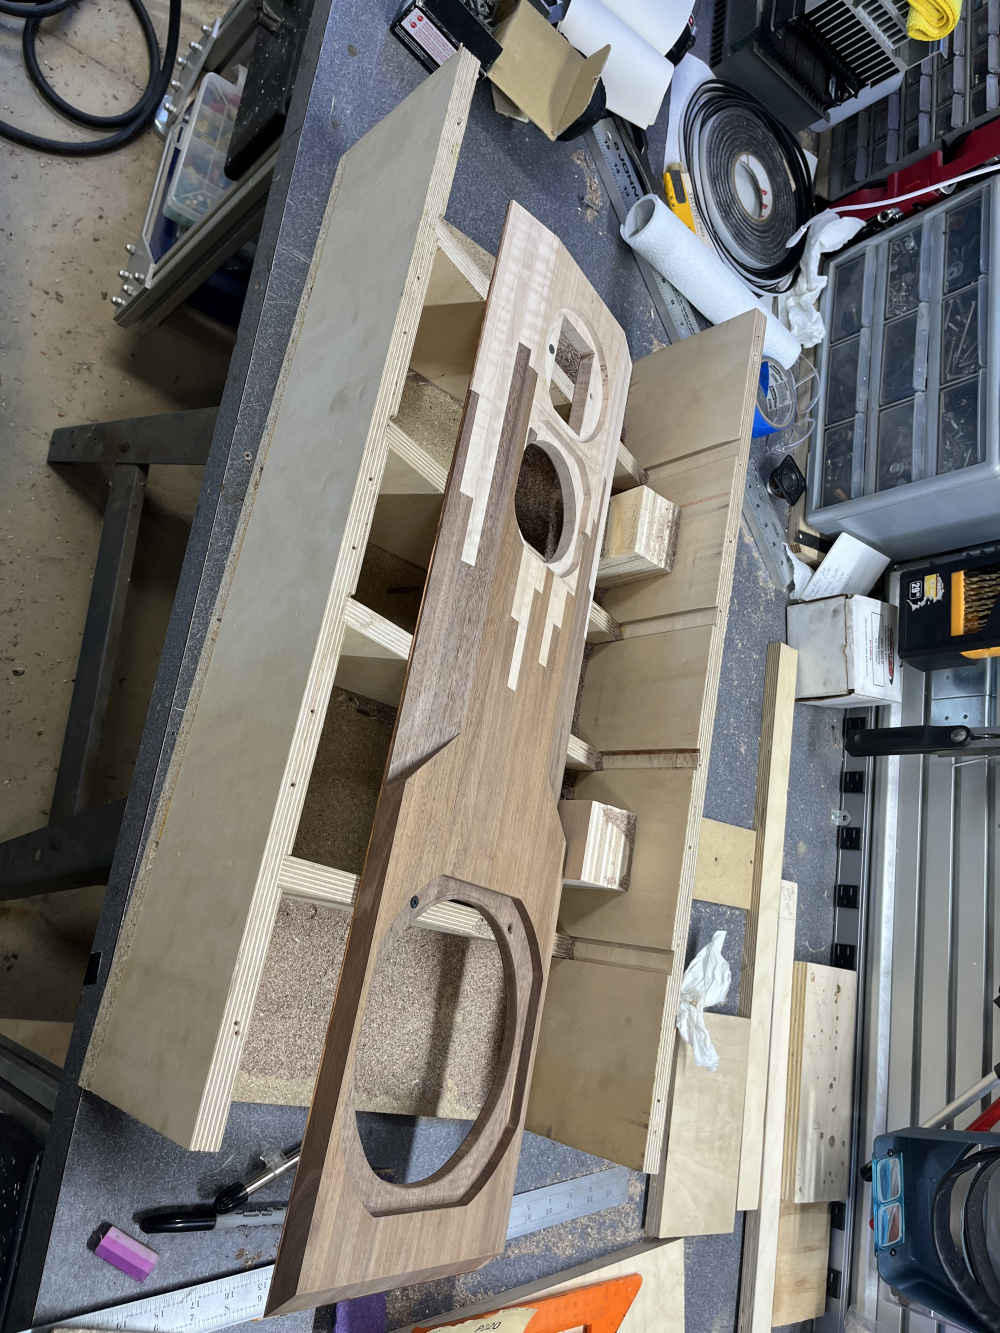
Looks like you have more $ in wood (re nice plywood) for that one jig than I have in my last 8 or so builds combined. lol
Good to know people😉
Though these days I chalk up money burned as a chosen entertainment cost - like f', a hipster touted food stop 40 bucks down the hole for a lunch, if lucky. But yeah, have to keep track of those nickels n dimes - if people still remember what coins are nowadays.
A high quality fixture is needed to make a high quality speaker!")
Besides which, you might use it again!
I can remember back in the day when I had a cushy union job working for the utility company in the electric meter department. I would pack a lunch every day. I had to attend some kind of training and I ate lunch with some people because they asked me to. The cheapest thing I could find was 7 bucks. So I ordered it, and I felt guilty for spending that money just to make a turd. I am still somewhat like that.
Reposting over in this thread at the request of some other members. I posted an initial version of this over in the 3D Printing thread.
A couple nights ago I came up with an idea for making a 3D printed circle jig for my Dewalt DCW600B battery powered router. I came up with a parametric model which can take the OD of a couple drivers (tweeter and woofer) and the cutout diameters of each. The router bit's diameter is also able to be specified, and I even made a separate parameter for both the flush mount bit and through-hole bit. Those parameters will generate a piece that fits into a base piece and accepts a 1/8" pin. Each driver's diameters will generate a hole for the through-hole cut (these will always be along the centerline of the "arm" piece). Additional pin holes are generated for the flush mounting passes, and the number of these will vary depending on the size of the router bit and the size of the overhang per driver.
The first iteration seemed to fit together pretty well, but had a few issues. The mounting holes for the base plate weren't quite right, and the sharp 90* edge of the base plate left the surface marred on my test piece. So I fixed those mounting holes and added a slight roundover to the base plate on v2. The driver tolerance parameter was also too big, so I cut that down in the second version of the "arm". I'm testing this on a speaker I'm developing with a Peerless XT25SC90-04 and a RS150P-4A, so all images below are for those drivers.
The model with 1/4" bit specified for the flush trim cuts:
And the same model with a 1/2" bit specified instead. Notice that there's fewer holes and they're spread out differently, but the two holes along the centerline are in the same locations because the through-hole bit diameter didn't change (1/4" in both):
The parameters for making a custom arm piece:
And the initial test baffle. Notice the slop in the tweeter hole, and the circular pattern around the tweeter from the original base plate. These issues were fixed in subsequent prints, and the woofer hole came out with a perfect fit:
The original jig attached to my router:
I'd be happy to share the Fusion360 model with anyone, and could also generate driver-specific STL files pretty easily if anyone has requests.
That's a great idea. I 3D printed a router jig with a sliding arm for infinitely adustable radii, but setting it up still requires some eyeballing. I never thought about 3D printing different arms for specific drivers. They're so small they'd be super cheap to make and easy to store.